Executive Summary: On February 28, 2026, the United Arab Emirates temporarily and partially closed its airspace following US and Israeli strikes on Iran, prompting suspension of all flight operations at Dubai International (DXB) and Al Maktoum International (DWC). Several Gulf countries including Bahrain, Qatar, and Iraq implemented similar airspace restrictions as regional tensions escalated, severely disrupting global air travel across the Middle East.
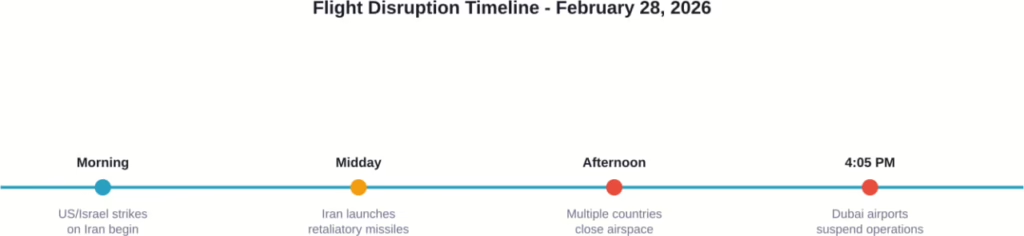
The United Arab Emirates implemented a temporary and partial airspace closure on February 28, 2026, in response to escalating military tensions across the Middle East. The decision came after the United States and Israel conducted strikes on several Iranian cities Saturday morning, which Iran met with retaliatory missile launches.
According to Dubai Airports, all flight operations at both Dubai International and Dubai World Central—Al Maktoum International were suspended until further notice. The authority issued a passenger advisory at 4:05 PM local time, urging travelers not to travel to the airport and to contact their airlines directly for updates.
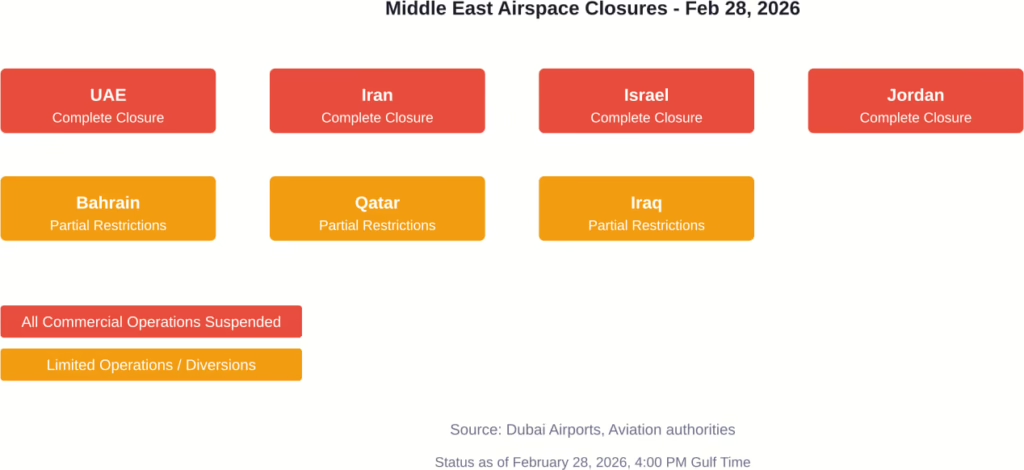
Regional Airspace Closures Across the Gulf
The UAE wasn’t alone. At least eight countries across the Middle East closed or restricted their airspace on February 28, creating one of the most significant aviation disruptions the region has seen in years.
Bahrain, Iraq, and Qatar all implemented airspace closures following the intensification of the conflict between Iran and Israel. FlightRadar24 data showed airspace rapidly emptying over Iran, Israel, Iraq, and Jordan as commercial carriers diverted or cancelled flights.
Countries implementing airspace restrictions across the Middle East on February 28, 2026
Impact on Dubai’s Aviation Hub
Dubai International, which welcomed 95.2 million passengers in 2025, came to a standstill. Flight status boards showed cancellations across the board. Emirates, the UAE’s flagship carrier, suspended all departures and arrivals.
Here’s what travelers faced that day:
Airport
Status
Advisory Issued
Dubai International (DXB)
All operations suspended
4:05 PM local time
Al Maktoum International (DWC)
All operations suspended
4:05 PM local time
Abu Dhabi International
Partial restrictions
Throughout the day
The General Civil Aviation Authority of the UAE emphasized that the decision followed a comprehensive assessment of security and operational risks. Safety of passengers and flight crews remained the top priority.
What Triggered the Closure
Saturday morning’s events unfolded rapidly. The United States and Israel launched coordinated strikes against several Iranian cities. Iran responded with ballistic missiles targeting US bases in the region.
According to the International Civil Aviation Organization’s Risk Assessment Manual for Civil Aircraft Operations over or near Conflict Zones (Doc 10084), States must assess risks from both deliberate attacks and unintentional impacts on civil aircraft. The document specifically addresses threats from surface-to-air missiles, ballistic missiles, and air-to-air attacks.
But wait. The UAE went further than just closing civilian airspace. State news agencies reported that the UAE intercepted several Iranian missiles, demonstrating the immediate nature of the threat.
Airlines Scramble to Respond
Global airlines suspended Middle East flights or implemented major diversions. Carriers avoided the entire region, routing flights around the affected airspace at significant cost.
According to aviation data research firm Cirium, of the 3,422 scheduled flights to Israel, Iran, Saudi Arabia, Oman, Bahrain, the UAE, Qatar and Jordan, 232 flights—or 6.7 per cent—were cancelled on Saturday. The disruption impacted global air travel:
Emirates, the UAE’s flagship carrier, suspended operations
International carriers rerouted flights away from Gulf airspace
Airlines flying between Europe and Asia faced longer, costlier re-routing with higher fuel and insurance costs
Russian airspace restrictions due to the Ukraine war further concentrated Europe-Asia traffic through Middle East corridors
According to Cirium data, the highest number of cancellations were for flights to Israel (37.3 per cent), followed by flights to Jordan (13.3 per cent) and to Qatar (10.1 per cent).
Timeline of key events leading to UAE airspace closure on February 28, 2026
Passenger Rights and Next Steps
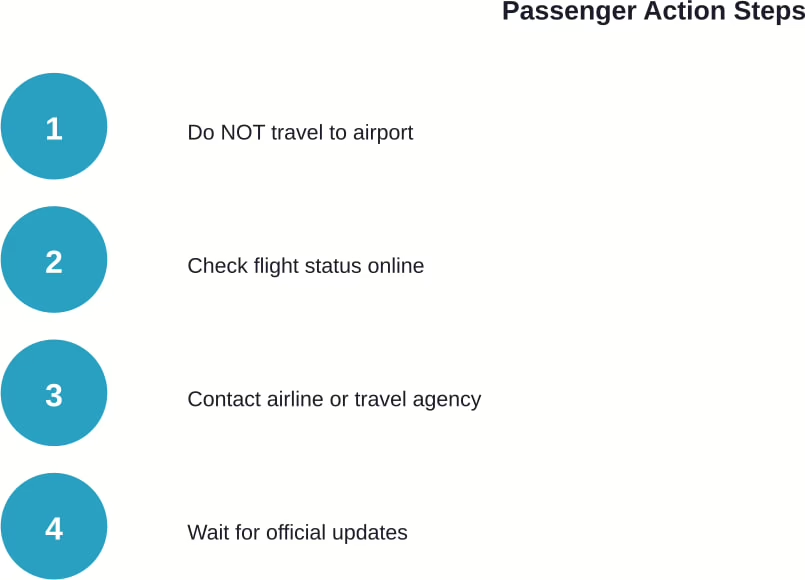
So what should affected passengers do? Dubai Airports made it clear: don’t travel to the airport. Check directly with airlines for rebooking options and refund policies.
Most major carriers offered flexible rebooking without change fees for flights scheduled on February 28 and 29. Travel insurance policies covering conflict-related disruptions became suddenly relevant for thousands of travelers.
Frequently Asked Questions
When did UAE close its airspace on February 28, 2026?
The UAE implemented a temporary and partial airspace closure on February 28, 2026, with Dubai Airports issuing a passenger advisory at 4:05 PM local time suspending all operations at DXB and DWC.
Which other countries closed airspace on February 28?
At least eight countries closed or restricted airspace, including Iran, Israel, Jordan, Bahrain, Qatar, and Iraq. The closures followed US and Israeli strikes on Iran and subsequent Iranian missile launches.
Are Dubai flights operating now?
As of the February 28 advisory, all flight operations at Dubai International and Al Maktoum International were suspended until further notice. Passengers should check directly with their airlines for current status.
Why did the UAE close its airspace?
The General Civil Aviation Authority stated the closure followed a comprehensive assessment of security and operational risks after military strikes and missile activity across the region. The UAE also intercepted several Iranian missiles according to state news agencies.
How long will the airspace closure last?
Dubai Airports stated the suspension would continue “until further notice” with no specific reopening timeline provided in the initial announcement. The situation depends on regional security developments.
What should passengers do if their flight is cancelled?
Dubai Airports advised passengers not to travel to the airport and to contact their airlines directly for rebooking options, refunds, and the latest flight updates.
Has this happened before in the UAE?
While the UAE has implemented temporary airspace restrictions during regional conflicts, a complete suspension of operations at both Dubai International and Al Maktoum International represents one of the most significant disruptions to the Emirates’ aviation hub.
Looking Ahead
The February 28 airspace closure demonstrates how quickly regional conflicts can impact global aviation. Dubai’s position as a major connecting hub means disruptions ripple worldwide.
Aviation authorities continue monitoring the situation closely. The International Civil Aviation Organization maintains updated NOTAMs (Notices to Airmen) for conflict zones, which pilots and airlines must check before every flight.
For travelers with upcoming flights through the UAE or Middle East, staying in direct contact with airlines remains essential. Check your flight status before heading to the airport, and consider travel insurance that covers conflict-related disruptions.
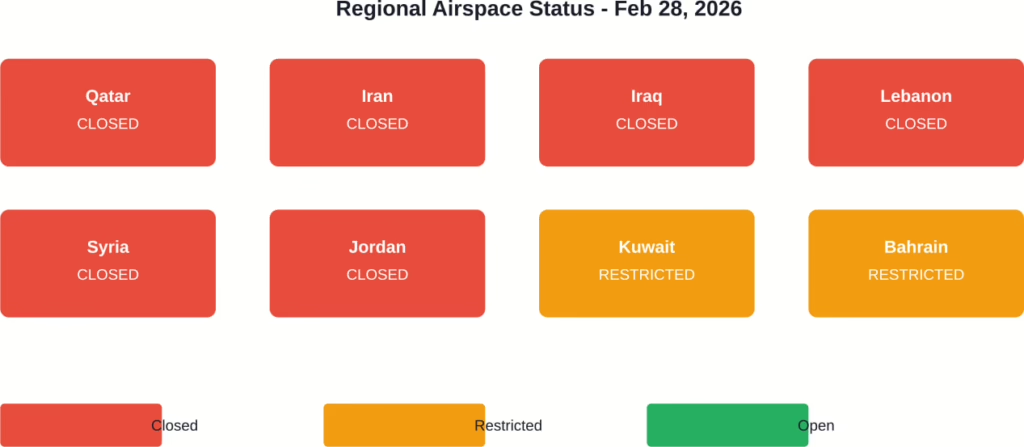
Executive Summary: On February 28, 2026, Qatar Airways and multiple international carriers suspended flights to and from Qatar due to the temporary closure of Qatari airspace following US and Israeli military strikes on Iran. The airspace closure affected eight Middle Eastern countries, forcing airlines including Turkish Airlines, Emirates, Lufthansa, and Air France to cancel services across the region until at least March 2-3, 2026.
February 28, 2026 became one of the most disruptive days in Middle Eastern aviation history. Qatar Airways confirmed the temporary suspension of all flights to and from Doha at 13:06 local time due to the sudden closure of Qatari airspace.
The announcement sent shockwaves through the travel industry. Thousands of passengers found themselves stranded as the airline worked closely with government stakeholders to assess the situation.
Why Did Qatar Close Its Airspace?
The airspace closure came in direct response to US and Israeli military strikes on Iranian targets. Tehran’s retaliatory measures prompted eight Middle Eastern countries to implement emergency airspace restrictions.
Following US and Israeli strikes on Iran, multiple countries including Iran closed their airspace, with flights diverting to avoid affected regions. The domino effect created a regional aviation crisis that impacted carriers worldwide.
Eight Middle Eastern countries implemented airspace restrictions on February 28, 2026 following military strikes on Iran.
Which Airlines Canceled Flights?
Qatar Airways wasn’t alone. Turkish Airlines suspended flights to Lebanon, Syria, Iraq, Iran, and Jordan until March 2. Saturday flights to Qatar, Kuwait, Bahrain, UAE, and Oman were also canceled.
Emirates Airlines, Lufthansa, and Air France followed suit. The coordinated response prioritized passenger safety above all else.
Airline
Affected Routes
Suspension Period
Qatar Airways
All flights to/from Doha
Feb 28 – until further notice
Turkish Airlines
Lebanon, Syria, Iraq, Iran, Jordan
Feb 28 – March 2
Turkish Airlines (regional)
Qatar, Kuwait, Bahrain, UAE, Oman
Feb 28 only
Emirates
Regional Middle East
Feb 28 – ongoing
What Should Passengers Do?
The r/qatarairways subreddit hosted discussions about the airspace closure and flight disruptions. Qatar Airways is working with relevant authorities to support impacted passengers. Qatar Airways flights including QR767, QR57, QR528, and QR725 were among those affected by the airspace closures.
Airlines typically offer rebooking options or refunds during airspace closures. Contact your carrier directly for the fastest resolution.
When Will Flights Resume?
The timeline remains uncertain. Qatar Airways stated operations will resume once government stakeholders clear the airspace for safe travel.
Turkish Airlines set a firm March 2 date for some routes, while Saturday-only cancellations suggest a more fluid situation. Passengers should monitor official airline channels for real-time updates.
FAQ
Why did Qatar Airways cancel flights on February 28, 2026?
Qatar Airways suspended all flights due to the temporary closure of Qatari airspace following US and Israeli military strikes on Iran and Tehran’s retaliatory measures.
Which airlines canceled Middle East flights on Feb 28?
Qatar Airways, Turkish Airlines, Emirates, Lufthansa, and Air France all suspended services to multiple Middle Eastern countries.
How many countries closed their airspace?
Eight Middle Eastern countries implemented airspace restrictions, including Qatar, Iran, Iraq, Lebanon, Syria, Jordan, Kuwait, and Bahrain.
When will Qatar Airways resume flights?
Qatar Airways hasn’t announced a specific date, stating operations will resume once authorities confirm safe flying conditions.
Can passengers get refunds for canceled flights?
Airlines typically offer rebooking or refunds during airspace closures. Contact your carrier directly for specific options.
Were flights diverted or just canceled?
Following the airspace closures, flights diverted away from affected regions, while many were canceled outright to avoid the closed airspace.
Did Turkish Airlines set a resumption date?
Turkish Airlines canceled flights to Lebanon, Syria, Iraq, Iran, and Jordan until March 2, 2026, with some routes potentially resuming sooner.
Stay Informed During Travel Disruptions
Regional conflicts can trigger sudden aviation changes. The February 28 situation demonstrates how quickly airspace closures cascade across carriers.
Check your airline’s official website and FlightAware for real-time flight status updates. Sign up for text alerts to receive immediate notifications about your specific flights. And always have a backup plan when traveling through geopolitically sensitive regions.
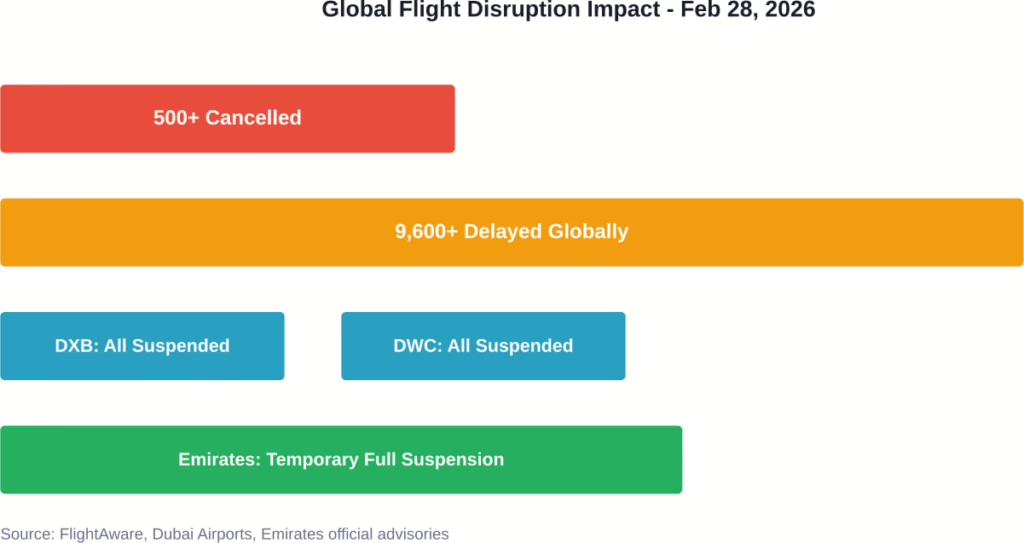
Executive Summary: On February 28, 2026, Dubai Airports suspended all flight operations at both DXB and DWC airports due to multiple regional airspace closures following US and Israeli strikes on Iran. Emirates, flydubai, and dozens of international carriers cancelled thousands of flights, with passengers advised not to travel to airports and to contact airlines directly for rebooking.
Saturday, February 28, 2026, became one of the most disruptive days in Dubai aviation history. Both Dubai International Airport (DXB) and Dubai World Central – Al Maktoum International (DWC) completely suspended operations. The reason? A cascading series of airspace closures across the Middle East following military strikes.
According to Dubai Airports, the official authority managing both facilities, all flight operations were suspended “until further notice” as of 4:05 PM Dubai time. Passengers received clear instructions: do not travel to the airport. Contact airlines directly for updates.
What Caused the Complete Shutdown
The suspension wasn’t a localized issue. Military operations involving the United States and Israel targeting Iran triggered widespread airspace closures across Iran, Iraq, and neighboring countries. When missiles started flying, commercial aviation had to clear out fast.
Emirates confirmed the scope of the crisis in their travel advisory last updated at 15:43 Dubai time on February 28. “Due to multiple regional airspace closures, Emirates has temporarily suspended all operations to and from Dubai,” the airline stated on their official help page.
Flight tracking data from FlightRadar24 showed virtually empty skies over the Middle East on February 28, a stark contrast to the region’s typically dense air traffic. More than 9,600 flights faced delays globally, with over 500 cancelled worldwide according to FlightAware’s tracking data as of 1030 GMT on February 28, 2026.
Overview of flight disruptions affecting Dubai and global aviation on February 28, 2026
Specific Flight Cancellations at Dubai Airports
Real-time flight status data from Dubai Airports showed the extent of cancellations. At Dubai International, multiple flights scheduled for 19:25 and 19:30 Dubai time were marked as cancelled.
Here’s what the official status boards showed:
Flight Number
Airline
Destination
Scheduled Time
Status
YI 571
Yemen Airways
Mitiga (MJI)
19:25
Cancelled
J9 126
Jazeera Airways
Kuwait (KWI)
19:25
Cancelled
FZ 979 / EK 2038
flydubai / Emirates
Yekaterinburg (SVX)
19:25
Cancelled
SG 016
SpiceJet
Ahmedabad (AMD)
19:25
Cancelled
FZ 143 / EK 2056
flydubai / Emirates
Amman (AMM)
19:30
Cancelled
At Dubai World Central, the situation was similar. Flight XY 228 to Riyadh and XY 524 to Jeddah, both operated by flynas, were cancelled. Interestingly, some flights like SU 775 to Yekaterinburg and H4 8680 to Cluj-Napoca initially showed as “On time” before the complete shutdown took effect.
Airlines Scrambling to Respond
Emirates wasn’t alone in suspending operations. The crisis forced dozens of international carriers to cancel or divert flights. Turkish Airlines flights to Istanbul turned back mid-route. LOT Polish Airlines diverted Warsaw-bound aircraft. Emirates flights from Dublin returned to their origin airport.
One passenger on a fully-boarded flight reported the sudden announcement: “About 10 minutes after the ‘boarding complete’ announcement we were told airspace is closed.”
Malaysia Airlines also felt the impact. Flights to Doha and Jeddah turned back over airspace risk advisories, highlighting how the disruption extended beyond just Dubai-bound routes.
What Passengers Were Told to Do
Dubai Airports issued clear passenger guidance. The advisory was blunt: passengers must not travel to the airport. Full stop.
For those with cancelled flights, the rebooking process varied by booking method. Customers who booked through travel agencies needed to contact those agencies directly. Those who booked directly with Emirates or other airlines had to reach out to the carrier.
The advisory emphasized checking flight status before making any airport journey. Given the “until further notice” nature of the suspension, that status could change at any moment.
Official guidance for passengers affected by Dubai flight cancellations on February 28, 2026 Regional Impact Beyond Dubai
Dubai wasn’t the only aviation hub affected. Qatar faced similar disruptions. Airlines suspended flights across the Middle East as countries closed their airspace. The strikes involving the US and Israel created a domino effect that emptied commercial planes from skies across Iran, Iraq, and neighboring airspace.
The scale was unprecedented. As one aviation analyst noted, the entire regional airspace essentially shut down for commercial operations. When military operations escalate to this level, civilian aviation has no choice but to ground everything.
Historical Context
Airlines have periodically cancelled flights to the Middle East region for years as conflicts arise. But complete suspension of operations at the world’s biggest international aviation hub? That’s rare.
Dubai International Airport typically handles massive volumes of international traffic. It’s designed as a global aviation hub connecting East and West. A full shutdown represents not just a regional crisis, but a significant disruption to worldwide air travel networks.
Frequently Asked Questions
When will Dubai airports reopen?
As of February 28, 2026, Dubai Airports stated operations are suspended “until further notice.” No specific reopening time has been announced. Passengers should monitor Dubai Airports’ official website and their airline’s travel advisories for updates.
Will I get a refund for my cancelled Dubai flight?
Refund and rebooking policies vary by airline. Contact your airline directly if you booked with them, or contact your travel agency if you booked through one. Most airlines offer rebooking or refunds during airspace closure situations, but specific terms depend on your ticket type and airline policy.
Are flights from Dubai also cancelled?
Yes. Dubai Airports suspended all operations, meaning both arrivals and departures at DXB and DWC are cancelled. Emirates specifically confirmed suspension of “all operations to and from Dubai.”
Which airlines cancelled Dubai flights on February 28?
Emirates, flydubai, Jazeera Airways, SpiceJet, Yemen Airways, flynas, Turkish Airlines, LOT Polish Airlines, Malaysia Airlines, United, Air India, Lufthansa, and Virgin Atlantic were among carriers that cancelled or suspended Dubai routes. The list includes dozens of international carriers.
How can I check my Dubai flight status?
Check Dubai Airports’ official flight status page at dubaiairports.ae for DXB or dwc.dubaiairports.ae for DWC. Emirates passengers should check emirates.com/help for travel updates. Most airlines are updating their websites with specific advisory pages.
Is it safe to fly to Dubai now?
Currently, it’s not possible to fly to Dubai as both airports have suspended all operations. Once operations resume, airlines and aviation authorities will determine safety protocols. The suspension was implemented specifically due to regional airspace safety concerns.
What caused the airspace closures?
Multiple regional airspace closures occurred following US and Israeli military strikes on Iran on February 28, 2026. Iran, Iraq, and neighboring countries closed their airspace to commercial aviation during the military operations, forcing Dubai airports to suspend operations due to the inability to safely route flights through the region.
Looking Ahead
The situation remains fluid. Dubai Airports committed to closely monitoring developments and providing updates as soon as available. Their media centre will publish official announcements as the situation evolves.
For now, thousands of passengers face uncertainty. Travel plans are disrupted. Airlines are working through massive rebooking queues. And the world’s busiest international airport sits quiet, waiting for airspace to reopen.
If your travel plans involve Dubai, don’t make any moves until you’ve confirmed your flight status directly with your airline. Check official sources frequently. And be prepared for changes as regional tensions continue to impact Middle East aviation.
Padel keeps rising fast in Dubai, blending quick rallies, glass-walled strategy, and that addictive social buzz. With perfect winter weather right now, outdoor courts really shine – offering fresh air, stunning backdrops like the sea or skyline, and a chance to play without feeling boxed in. Whether someone wants serious training, casual games with friends, or just a scenic workout, the city’s leading venues deliver high-quality surfaces, great lighting, and extras like cafes or coaching that make every session feel elevated.
Top providers stand out by mixing prime locations with thoughtful setups – think rooftop terraces overlooking the city, beach-adjacent spots with ocean breezes, or lush green surroundings that turn a match into an experience. These places often feature multiple courts for easy booking, pro-level maintenance, and communities that welcome everyone from beginners smashing their first volleys to experienced players hunting competitive games. In a city that loves blending sport with luxury, the best outdoor options capture that effortless Dubai style while keeping the focus on fun, fitness, and connection on the court.
1. Taj Exotica Dubai
Taj Exotica Dubai the padel court sits right on the beachfront along the East Crescent of Palm Jumeirah. One outdoor court opens up to ocean views and the Palm Island in the background, so every game gets a pretty scenic backdrop. Hotel guests pay a lower rate to book, external players pay a bit more, and there’s a small extra charge for racket rental if needed. Sessions usually run an hour and a half or longer, and the spot welcomes both in-house guests and locals looking for something different. Pricing depends on guest status and stays quite clear. With just one court in this part of the crescent, the atmosphere feels fairly exclusive and relaxed. People book ahead, and the whole thing mixes sport with that easy resort feel – nothing too intense, just a nice place to hit the ball in beautiful surroundings.
Key Highlights:
Beachfront location with ocean and Palm views
Single outdoor court
Different rates for hotel guests and external players
Racket rental available for an extra fee
Exclusive to the East Crescent area
What’s on Offer:
Court booking for padel sessions
Racket rentals
Contact Information:
Website: www.exoticadubai.tajhotels.com
Phone: +97142754444
Address: East Crescent Road, Palm Jumeirah, Dubai, United Arab Emirates
Email: reservations.exoticadubai@tajhotels.com
LinkedIn: www.linkedin.com/company/tajpalmdubai
Facebook: www.facebook.com/tajpalmdubai
Instagram: www.instagram.com/tajpalmdubai
2. Redline Padel Club
Redline Padel Club runs outdoor courts in several areas around Dubai – some rooftop ones in residential spots, others in more lively locations. The courts often get praise for being well-maintained and reasonably priced, and people come for that community vibe without any extra hassle. Coaches have solid experience, the atmosphere makes it easy to play regularly – works for total beginners and those already hooked on padel.
Having multiple spots gives options depending on where you live or work. Booking courts or lessons is straightforward, and quite a few locations have nearby lounges or places to grab food. Overall it’s a no-fuss padel setup that keeps players coming back.
Key Highlights:
Outdoor courts in different parts of Dubai
Affordable pricing
Community-oriented feel
Coaching from experienced instructors
What’s on Offer:
Court booking
Individual and group coaching
Social games and meetups
Contact Information:
Website: www.redlinesportsclub.com
Phone: +971 52 457 1816
Address: ZABEEL HOUSE ONIX TOWER 3 (4TH FLOOR TERRACE) DUBAI
Facebook: www.facebook.com/redlinesportsclub
Instagram: www.instagram.com/redlinesportsclub
3. La Cantine Sports Club
La Cantine Sports Club launched on Bluewaters Island with six outdoor courts set in a nicely landscaped area – perfect for hanging out with friends before or after a match. The place was built as a proper lifestyle spot: padel paired with Mediterranean-style food and a small boutique selling gear and clothing. It suits both serious players who want reliable courts and people who just want an active, good-looking way to spend time.
The setup feels thoughtful without being overdone. Courts run from daytime into the evening, and everything flows naturally from playing to relaxing. A lot of people mention the sea closeness and how easily it combines sport with downtime.
Key Highlights:
Six outdoor courts
Landscaped social zones around the courts
Mediterranean-inspired dining on site
Boutique with padel and lifestyle items
What’s on Offer:
Court bookings
Food and drinks
Equipment and apparel sales
Social and wellness activities
Contact Information:
Website: lacantinesportsclub.ae
Phone: 045566623
Email: info@lacantinesportsclub.ae
Address: La Cantine Sports Club, La Cantine Beach, Delano Dubai, Bluewaters Island
Instagram: www.instagram.com/lacantinesportsclub
4. Club Padel Dubai
Club Padel Dubai offers four shaded outdoor courts – roof overhead but still open air, with high ceilings. The shading helps a lot against heat and humidity, so playing feels comfortable almost any time of year. In total there are eight courts on site, the rest indoors, plus a pro shop for gear and a bistro for a quick bite.
The shaded setup is their main thing – it gives that outdoor feeling with some protection from the elements. Booking goes smoothly, plenty of regulars who like the consistency. Parking is convenient too.
Key Highlights:
Four shaded outdoor courts with high ceiling
Mix of open-air feel and coverage
Eight courts total on the premises
Pro shop and bistro on site
What’s on Offer:
Booking for outdoor and shaded courts
Equipment sales
Casual dining
Contact Information:
Website: www.clubpadel.ae
Phone: +971 4 273 4431
Email: Info@clubpadel.ae
Address: 6B Street – Al Quoz – Al Quoz Industrial Area 3 – Dubai
LinkedIn: www.linkedin.com/company/club-padel-uae
Facebook: www.facebook.com/Clubpadeldubai
Instagram: www.instagram.com/clubpadeldubai
5. Viya Padel at Jumeirah Golf Estates
Viya Padel at Jumeirah Golf Estates features four state-of-the-art open-air padel courts in a golf estate setting. The place draws on years of involvement in Dubai’s padel growth, offering coaching, structured programs, and lesson packages that suit beginners right through to more seasoned players. Operating hours run from morning until evening, and pay-and-play bookings let people drop in for casual games with friends.
The setup focuses on providing a consistent experience with expert guidance to help improve technique and enjoyment – all on fully outdoor courts that let you feel the breeze and natural light. Social play fits in naturally alongside more formal lessons. Many who play here appreciate the calm surroundings that come with being part of a golf community spot, especially when the weather cooperates and the open sky makes every session feel a bit more refreshing.
Padel Pro runs courts in a few prime spots around Dubai like Jumeirah Park, Al Quoz, and One Central. The setup includes options for full court bookings along with skill-based matchmaking that pairs players for matches. Coaching comes in different formats – one-on-one, semi-private, group sessions, and even junior programs for kids. Tournaments happen regularly too, with formats that suit various skill levels, from ladies’ events to parent-kid doubles.
Some sessions happen outdoors depending on the location, though it’s not always specified which ones. The focus stays on making play accessible for everyone, with an emphasis on community through organized match play and social vibes. Booking works for standard court time or coaching, and people often mention the convenience of the scattered locations.
Key Highlights:
Courts in Jumeirah Park, Al Quoz, and One Central
Skill-based matchmaking for matches
Various coaching formats including junior training
Regular tournaments for different levels
What’s on Offer:
Full court bookings
Matchmaking sessions
Personalized and group coaching
Tournament participation
Contact Information:
Website: padelpro.ae
Phone: +971 43277762
Email: hello@padelpro.ae
Address: Al Quoz Industrial Area 2, Al Quoz, Dubai, United Arab Emirates
LinkedIn: www.linkedin.com/company/padel-pro-uae
Facebook: www.facebook.com/padelprouae
Instagram: www.instagram.com/padelpro.dubai
7. World Padel Academy
World Padel Academy keeps facilities in Dubai along with other spots in the UAE. Courts include both indoor and outdoor options, though specific outdoor details in Dubai don’t get much breakdown on the site. Services cover straightforward court bookings plus coaching aimed at all levels, from total beginners onward. Events and tournaments pop up regularly, and there’s a push toward community activities and even corporate wellness stuff.
The places aim for a consistent experience whether someone drops in casually or trains more seriously. Coaching stays available through certified instructors. It’s all part of trying to keep the padel scene growing locally without too much fuss.
Key Highlights:
Indoor and outdoor courts in Dubai
Coaching for all skill levels
Events and tournaments
Community-driven activities
What’s on Offer:
Court bookings
Professional coaching
Tournaments and events
Corporate wellness programs
Contact Information:
Website: wpa.ae
Email: info@wpa.ae
Address: 56 3B St Al Quoz 1 Dubai
Facebook: www.facebook.com/wpa.ae
Instagram: www.instagram.com/wpa
8. Padel Park
Padel Park has outdoor courts set up at The Ripe Market on Academy Park along Umm Suqeim Road, plus another spot at The Pointe West on Palm Jumeirah. Courts stay well-maintained with good lighting for day or night play, and they come with extras like video recording options and on-site rackets or balls if needed. Booking happens online for different session lengths, and matchmaking helps put together teams based on skill, age, or preferences.
Coaching includes private, group, and junior sessions starting from young kids. Tournaments run for ladies or mixed groups, and social games get arranged for casual hangs or events like birthdays. The whole setup feels geared toward keeping things active and social in central Dubai areas.
Key Highlights:
Outdoor courts at The Ripe Market and The Pointe West
Well-lit courts for night play
Equipment available on site
Matchmaking by skill and preferences
Video recording and streaming options
What’s on Offer:
Court bookings for various durations
Private and group coaching
Junior coaching
Matchmaking services
Tournaments and social games
Contact Information:
Website: padelpark-dubai.com
Phone: +971 58 590 8921
Email: info@padelpark-dubai.com
Address: The Ripe Market, Academy Park. Umm Suqeim, Dubai
Facebook: www.facebook.com/padelparkdubai
Instagram: www.instagram.com/padelparkdubai
9. Just Padel
Just Padel spreads courts across different parts of Dubai to make access easier no matter where someone is. The courts use standard surfaces with glass walls and mesh surrounds, and the emphasis lands on keeping things clean and straightforward with parking, refreshments, and basic amenities. Booking goes through a mobile app for convenience, and coaching comes from pros to help players improve.
Community gets built through regular engagement, and discounts sometimes apply for certain groups. It’s positioned as a go-to for casual sessions with friends or family. The scattered locations help avoid long trips just to play.
Key Highlights:
Courts located across Dubai
Accessible locations citywide
Mobile app for booking
Professional coaching available
What’s on Offer:
Court rentals and bookings
Coaching sessions
Refreshments on site
Community engagement
Contact Information:
Website: justpadel.ae
Phone: +971 55 9928 022
Email: info@justpadel.ae
Address: Just Play Sports Complex, 15A Street, Al Quoz Industrial 1 – Dubai
LinkedIn: www.linkedin.com/company/just-padel-ae
Facebook: www.facebook.com/Justpadelae
Instagram: www.instagram.com/justpadel_ae
10. Casa Padel
Casa Padel sits in Ras Al Khor Industrial area at SMARK 2. The club handles online court reservations and sets up weekly social tournaments for fun competition. Matchmaking pairs people by level so games feel balanced. Coaching runs individual or group style with certified pros focusing on technique and strategy for anyone from beginners to more competitive types.
Events extend beyond regular play into things like team-building, private parties, or corporate tournaments. The spot combines sport with a community feel in a central-ish location. Many come back because the vibe encourages returning.
Key Highlights:
Location in Ras Al Khor Industrial Second
Online court reservations
Weekly social tournaments
Player matchmaking by level
Individual and group coaching
What’s on Offer:
Court booking online
Social tournaments
Coaching programs
Events and corporate functions
Contact Information:
Website: casapadel.ae
Phone: +971 58 502 4712
Email: reception@casapadel.ae
Address: SMARK 2, OFF4-71, Ras Al Khor Industrial Second
Instagram: www.instagram.com/casapadel_club
11. Ballers Padel by Gaby Reca
Ballers Padel by Gaby Reca features outdoor courts overlooking the Burj Khalifa in the Downtown area. The six courts carry World Padel Tour approval. Court rentals come with peak and off-peak pricing options. Coaching draws from Argentine and Spanish instructors who cover all levels, from newcomers to advanced players.
A social community side brings people together for games suited to different abilities. The setup mixes play with that iconic city view. Booking covers rentals, lessons, or joining the social groups.
Dubai’s outdoor padel scene keeps getting better every season, and right now – with the cooler months in full swing – it’s honestly one of the nicest times to get out there and play. The city has done a solid job spreading courts across different vibes: some tucked into beachfront resorts with that salty breeze, others perched on rooftops catching skyline glow, a few shaded just enough to dodge the worst of the sun without losing the open-air feel. What stands out most is how these spots manage to turn a simple game into something that feels special – whether it’s the backdrop, the crowd that shows up, or just the way everything flows from a quick rally to drinks and chat afterwards. At the end of the day, the right outdoor court really comes down to what you’re after that particular afternoon. Craving something scenic and relaxed? Head toward the water or a landmark view. Want easy access and a buzzing social scene? The central or community-focused ones deliver without much hassle. Pick based on location, how shaded you need it, or whether you’re there for serious practice versus messing around with friends – either way, the options are strong enough that you’ll probably end up with a favorite spot pretty fast. Grab a court soon while the weather’s this perfect; padel in Dubai outdoors just hits different when the temperature cooperates.
Padel has taken Dubai by storm, blending tennis and squash into a fast-paced, social game that’s impossible to put down once you start. With scorching summers making outdoor play tough, the city’s leading venues have stepped up with impressive indoor setups-climate-controlled courts that let enthusiasts rally anytime without sweating the weather. These top spots stand out for their high-quality surfaces, thoughtful amenities, and vibrant communities that draw everyone from beginners picking up a racket for the first time to seasoned players chasing competitive matches.
What sets the best indoor options apart goes beyond just having courts under a roof. Many integrate recovery zones like saunas or contrast therapy, pair play with coaching from experienced pros, or create that effortless post-game vibe with lounges and cafés. Whether someone craves a focused training environment, a social hub for group games, or a luxurious escape that feels like more than just sport, Dubai delivers standout choices across neighborhoods like Al Quoz, Dubai Sports City, and beyond. Here are some of the leading facilities making indoor padel the go-to activity right now.
1. Padel Edition
Padel Edition eight pro-standard indoor courts sit at the core of this spot in Al Quoz, where the focus is on combining padel with recovery and movement options. A luxurious recovery suite offers contrast therapy, including ice baths and saunas, while the serene fitness studio offers classes in stretching, mobility, and yoga. Face workouts happen in a dedicated area for non-invasive facial fitness and rejuvenation, and there’s a vibrant café serving nutritious meals, smoothies, and snacks. The entire setup feels designed for individuals who want to train, recharge, and balance their lives in one place.
Key Highlights:
Pro-standard indoor courts with professional-grade surfaces
Contrast recovery suite including ice bath and infrared sauna
Versatile studio for yoga, stretching, and mobility sessions
On-site café with healthy food and drinks
Face gym for rejuvenation treatments
What’s on Offer:
Court bookings for padel games
Recovery sessions in dedicated suite
Yoga and mobility classes
Facial fitness workouts
Café dining
Studio bookings for group sessions
Contact Information:
Website: padeledition.ae
Address: Warehouse S01 ,18th Street, Al quoz industrial 1 Dubai
Phone: +971 4 348 7481
Email: contact@padeledition.ae
2. The Lob
The Lob this place runs high-quality indoor courts built to WPT standards, complete with panoramic views and no blind spots for anyone watching. Players of all levels show up here since the community side gets plenty of attention through social sessions, competitive leagues, and expert coaching that helps beginners and advanced folks alike. A movement studio handles yoga, hot yoga, mat and reformer Pilates, plus meditation, and there’s a private infrared sauna for post-game recovery. The bio-hacking restaurant on site keeps the wellness angle going with nutrition-focused meals.
Key Highlights:
WPT-approved indoor courts with spectator-friendly design
Panoramic viewing without blind spots
Strong emphasis on community and all skill levels
Private infrared sauna
On-site wellness-focused restaurant
What’s on Offer:
Court rentals and bookings
Expert coaching sessions
Yoga, Pilates, and meditation classes
Competitive leagues and social events
Recovery sauna access
Dining at the restaurant
Contact Information:
Website: thisisthelob.com
Email: info@thisisthelob.com
Instagram: www.instagram.com/thisisthelob
3. SIRO Padel Courts
SIRO Padel Courts’ world-class indoor padel courts occupy the ground floor of One Za’abeel, set up for focused play with an eye on performance and quick recovery. The setup ties into the hotel’s wellness vibe, so pre- or post-game energy comes from the Refuel Bar, and there’s even an indoor co-working space nearby for anyone wanting to mix business with sport. It’s geared toward enjoyable sessions where players can book easily and feel the difference in court quality and surroundings.
Key Highlights:
Indoor courts designed for high performance
Ground-floor location in a premium tower
Integration with refuel bar for drinks and snacks
Nearby indoor co-working option
Focus on faster recovery and enjoyable play
What’s on Offer:
Court bookings for padel
Pre- and post-game refueling at the bar
Performance-oriented play sessions
Contact Information:
Website: www.sirohotels.com
Phone: +971 4 666 1717
Address: One Central, The Offices Building 2, 9th Floor, World Trade Centre Dubai, United Arab Emirates
Email: info.onezaabeel@sirohotels.com
Instagram: www.instagram.com/sirohotels
4. Padel Pro
Padel Pro state-of-the-art courts sit in prime spots around Dubai, with options for both indoor and outdoor sessions depending on the location. Al Quoz has panoramic indoor courts for consistent play no matter the weather, while places like One Central lean outdoor courts with views. Coaching covers everything from one-on-one to group sessions and junior programs focused on technique and fun, plus matchmaking pairs players by skill for casual or competitive games. Tournaments happen regularly with categories for different levels, and the vibe includes music, refreshments, and spaces for spectators – all aimed at making padel approachable for beginners through advanced players.
Key Highlights:
Indoor and outdoor court options in convenient Dubai locations
Skill-based matchmaking for games
Tournaments across various player levels
Changing facilities and parking
Welcoming setup for all ages and skills
What’s on Offer:
Court bookings for sessions
Private and group coaching
Junior training programs
Match play sessions
Tournament participation
Contact Information:
Website: padelpro.ae
Phone: +971 43277762
Email: hello@padelpro.ae
Address: Al Quoz Industrial Area 2, Al Quoz, Dubai, United Arab Emirates
LinkedIn: www.linkedin.com/company/padel-pro-uae
Facebook: www.facebook.com/padelprouae
Instagram: www.instagram.com/padelpro.dubai
5. World Padel Academy
World Padel Academy premium courts come in both indoor and outdoor setups across Dubai, Sharjah, and Abu Dhabi, with a focus on quality facilities that suit players looking to train seriously. The place started as one of the earlier purpose-built padel centers in Dubai and supports everyone from casual enthusiasts to the UAE national team through coaching and structured lessons. Amenities cover equipment rentals, food and drinks, memberships, leagues, and app-based booking via Playtomic. New standalone venues keep rolling out, and partnerships help expand spots in good locations.
Key Highlights:
Indoor and outdoor premium courts
Coaching from certified pros
Support for national team training
Leagues and tournaments
App for easy bookings
What’s on Offer:
Court access and rentals
Professional coaching lessons
Group and individual training
League participation
Equipment provision
Contact Information:
Website: wpa.ae
Email: info@wpa.ae
Address: 56 3B St Al Quoz 1 Dubai
Facebook: www.facebook.com/wpa.ae
Instagram: www.instagram.com/wpa
6. Just Padel
Just Padel courts are spread strategically across the city for easier access, with a strong push on building sustainable communities where players of any age or level can join in. Facilities include refreshments, parking, first aid, rentals, washrooms, and clean, safe setups. Customer service gets attention to make sessions memorable and encourage repeat visits, while the app handles bookings smoothly. Focus stays on fun group play with friends or family, plus ways to engage the growing padel crowd in the region.
Key Highlights:
Courts in multiple accessible locations
Emphasis on community connections
App-based booking system
Safety and comfort amenities
Inclusive for all skill levels
What’s on Offer:
Court rentals
Equipment rentals
Group play sessions
Community events
Contact Information:
Website: justpadel.ae
Phone: +971 55 9928 022
Email: info@justpadel.ae
Address: Just Play Sports Complex, 15A Street, Al Quoz Industrial 1 – Dubai
LinkedIn: www.linkedin.com/company/just-padel-ae
Facebook: www.facebook.com/Justpadelae
Instagram: www.instagram.com/justpadel_ae
7. Casa Padel
Casa Padel, this boutique club in the Ras Al Khor Industrial area, opens its doors to beginners and pros alike, blending sport with a comfortable, aesthetic environment that draws people back. Court reservations happen online, with weekly social tournaments and level-based player matching for casual or competitive matches. Coaching programs offer one-on-one or group sessions from certified coaches covering technique, strategy, and positioning. Events go beyond regular play – think team-building, celebrations, or corporate tournaments in the space.
Key Highlights:
Boutique club setup with premium feel
Online court reservations
Player matching by level
Weekly social tournaments
Event hosting capabilities
What’s on Offer:
Court bookings
Individual coaching lessons
Group training sessions
Social tournaments
Corporate and private events
Contact Information:
Website: casapadel.ae
Phone: +971 58 502 4712
Email: reception@casapadel.ae
Address: SMARK 2, OFF4-71, Ras Al Khor Industrial Second
Instagram: www.instagram.com/casapadel_club
Conclusion
Wrapping this up, Dubai’s indoor padel scene keeps delivering in ways that surprise even regulars – those climate-controlled courts mean the game never really stops, no matter how brutal the summer gets. Whether someone gravitates toward spots heavy on recovery perks like saunas and contrast dips, or ones that lean into coaching and community vibes with social matches and matchmaking, there’s always a fit somewhere. It all comes down to what clicks for you right now: a quick hit with friends after work, serious drills to sharpen technique, or blending play with wellness rituals that leave you feeling recharged instead of wrecked.
The real draw stays in how these places turn padel into more than just another workout – it’s social, addictive, and oddly therapeutic in this fast-moving city. Grab your racket, book ahead (slots fill up quick these days), and dive in. Once you start chasing those impossible shots indoors, good luck stepping away. Dubai’s got the facilities dialed in; the rest is up to how much fun you’re ready to have on the glass-walled court.
Padel keeps surging in popularity across Dubai, blending the thrill of tennis with the strategy of squash in a way that feels perfectly suited to the city’s energetic lifestyle. With dozens of courts popping up everywhere from industrial zones to beachfront spots, the scene delivers options for casual rallies under the sun or intense matches in climate-controlled luxury. What stands out most is how these top venues go beyond just the game-they create social hubs where players connect, improve skills, and soak in that unmistakable Dubai flair.
Leading providers set the standard with state-of-the-art glass-walled courts, professional-grade surfaces, and extras like expert coaching, pro shops, and post-game lounges. Whether someone craves panoramic views, shaded outdoor play, or year-round indoor reliability, the city’s elite spots cater to beginners building confidence and seasoned players chasing perfection. Here’s a look at what makes these standout facilities the go-to choices right now.
1. Padel Edition
Padel Edition sits in Al Quoz and focuses on indoor play with a wellness twist. Glass-walled courts provide consistent conditions year-round, away from the heat or rain. The setup includes recovery areas with things like ice baths and saunas for after sessions, plus a studio space that runs stretching, mobility, and yoga classes. A café handles snacks, smoothies, and light meals, while face gym options add another layer for some facial toning. It’s built around combining the game with recharge time, so people tend to stay longer.
The place draws in casual players who want a relaxed hit and those pushing their skills harder. Booking flows through an online system for courts or classes. The overall feel balances effort on the court with proper downtime afterward.
Key Highlights:
Indoor professional-grade courts
Recovery area with ice bath and sauna
Studio for yoga and stretching
Café with nutritious options
Face gym available
What’s on Offer:
Court bookings
Yoga and mobility classes
Contrast recovery
Face workouts
Casual dining
Contact Information:
Website: padeledition.ae
Address: Warehouse S01 ,18th Street, Al quoz industrial 1 Dubai
Phone: +971 4 348 7481
Email: contact@padeledition.ae
2. Padel Pro
Padel Pro has been around since the early days of the sport’s boom here, with spots scattered in places like Al Quoz, One Central, and Jumeirah Park. Courts mix indoor and outdoor depending on the branch, and most come with pro shops, cafés, lounges, and solid changing areas. Coaching covers basics through advanced play, welcoming all ages and levels. Matchmaking helps pair people by skill for fair games, and junior sessions build technique in small groups.
Tournaments happen fairly often, from ladies’ events to family-style ones. Private, semi-private, or group lessons focus on technique and building confidence. It’s more about showing up, playing, and linking up with others who get into it.
Key Highlights:
Locations spread across Dubai
Indoor and outdoor court mix
Skill-based matchmaking
Tournaments and community events
Junior sessions for younger players
What’s on Offer:
Full court bookings
One-on-one coaching
Semi-private lessons
Group training
Junior programs
Match play options
Contact Information:
Website: padelpro.ae
Phone: +971 43277762
Email: hello@padelpro.ae
Address: Al Quoz Industrial Area 2, Al Quoz, Dubai, United Arab Emirates
LinkedIn: www.linkedin.com/company/padel-pro-uae
Facebook: www.facebook.com/padelprouae
Instagram: www.instagram.com/padelpro.dubai
3. Emirates Golf Club
Emirates Golf Club adds padel to its main golf setup in a green, established spot. Courts are available for straightforward pay-and-play, with options to book single courts for small groups or grab packs for more frequent sessions. The vibe ties into the club’s relaxed atmosphere, so it suits people who already golf or just want something different in a quieter area.
Reservations go through their system or app, with timing that fits day or evening play. It’s less of a dedicated padel center and more an extra amenity in a bigger leisure complex.
Dusit Thani Dubai keeps a padel court right on its hotel property as part of the leisure options. The glass-walled setup feels premium, with rental gear if anyone forgets theirs. It opens early morning through late evening, and some rates get preferential for regulars or guests. Views add a nice touch, especially with the city skyline in the background.
Beginners dip in to try it out, while others pop by for a quick match without much hassle. It’s handy as an on-site thing rather than a full standalone club. Bookings stay simple and direct.
Key Highlights:
Glass-walled premium court
Gear rental on hand
Extended daily hours
What’s on Offer:
Court reservations
Equipment rental
Contact Information:
Website: www.dusit.com
Phone: +971 (4) 343 3333
Email: info.d2jo@dusit.com
Address: 133 Sheikh Zayed Road, P. O. Box 23335, Dubai, United Arab Emirates
World Padel Academy runs padel courts across spots in Dubai, Sharjah, Abu Dhabi, and even Khor Fakkan. Venues come with indoor and outdoor options, plus solid amenities like quality court surfaces, equipment for rent or use, food and beverage spots, and coaches who handle lessons for different levels. Beginners get structured sessions to pick up basics, while others can jump into games or training. Bookings happen online, often through apps like Playtomic, and the places host leagues, tournaments, plus community stuff and corporate programs. Memberships bring some perks too. It’s spread out, so location depends on where someone lives or works.
The focus stays on keeping things accessible for casual play or more serious improvement. Certified coaches guide sessions, and facilities stay maintained for consistent games. Food options and equipment add convenience without much hassle. Many who play there mention the mix of social events and regular coaching as what keeps them coming back.
Key Highlights:
Indoor and outdoor courts
Locations in multiple emirates
Equipment available
Food and beverages on site
Specialised coaching
What’s on Offer:
Court bookings
Lessons with certified coaches
Leagues and tournaments
Corporate wellness programs
Community activities
Membership options
Contact Information:
Website: wpa.ae
Email: info@wpa.ae
Address: 56 3B St Al Quoz 1 Dubai
Facebook: www.facebook.com/wpa.ae
Instagram: www.instagram.com/wpa
6. Taj Exotica Dubai
Taj Exotica Resort & Spa on Palm Jumeirah keeps a beachfront padel court as part of its experiences. The setup sits right by the ocean with views of the water and the Palm island, making sessions feel open and scenic rather than enclosed. It’s open to hotel guests and outside visitors alike, with bookings for set time slots. Rental rackets come available if needed, and the court handles both friendly matches and solo practice. Hours run daily from morning to evening.
This works well as an add-on for people already at the resort or those wanting something relaxed with a luxury touch. Guests often pair it with pool time or other activities. Rates differ between in-house and external players, but it’s straightforward to reserve directly. The beachfront spot sets it apart from busier urban courts.
Key Highlights:
Beachfront location with ocean views
Open to guests and non-guests
Racket rental option
What’s on Offer:
Court bookings
Equipment rental
Contact Information:
Website: www.exoticadubai.tajhotels.com
Phone: +97142754444
Address: East Crescent Road, Palm Jumeirah, Dubai, United Arab Emirates
Email: reservations.exoticadubai@tajhotels.com
LinkedIn: www.linkedin.com/company/tajpalmdubai
Facebook: www.facebook.com/tajpalmdubai
Instagram: www.instagram.com/tajpalmdubai
7. Redline Padel Club
Redline Padel Club spreads out across a few spots in Dubai with outdoor courts that stay affordable and open for single or double bookings. Locations include places like The Greens on a rooftop setup, Al Barsha in a community vibe, and Al Quoz for something more energetic. Coaching comes from experienced people who help with technique and play. Premium lounges and some dining tie-ins make it easy to hang out after games. The setup keeps things social without overcomplicating the experience.
Many who play there appreciate the spread-out locations that fit different parts of the city. Booking stays simple for courts or sessions. Outdoor play means dealing with weather, but the spots handle it with good surfaces. It suits casual drop-ins or folks building regular habits.
Key Highlights:
Outdoor courts in multiple locations
Rooftop option at The Greens
Community-focused atmosphere
Dining partnerships nearby
What’s on Offer:
Court bookings for single or double
Coaching sessions
Social play opportunities
Contact Information:
Website: www.redlinesportsclub.com
Phone: +971 52 457 1816
Address: ZABEEL HOUSE ONIX TOWER 3 (4TH FLOOR TERRACE) DUBAI
Facebook: www.facebook.com/redlinesportsclub
Instagram: www.instagram.com/redlinesportsclub
8. Padel Park
Padel Park keeps courts in spots like Academy Park on Umm Suqeim Road and The Pointe West at Palm Jumeirah. Courts meet standard sizes with glass walls that sound good and stay well-lit day or night, plus video options for recording. Equipment comes provided, and refreshments, parking, washrooms sit nearby. Packages cover different needs, while matchmaking groups players by skill, age, or gender. Coaching happens in private, group, or junior formats, and tournaments or social games pop up.
The community side draws people in for regular interaction through events or casual arrangements like birthday games. Booking goes online via platforms or direct, with slots up to a month ahead. It all centers on bringing players together in accessible spots around Dubai.
Key Highlights:
Courts at multiple Dubai locations
Standard-sized well-maintained courts
Equipment and refreshments available
Matchmaking by skill and preferences
Tournaments including ladies and mixed
What’s on Offer:
Court bookings
Private and group coaching
Junior coaching sessions
Matchmaking for games
Social events and team building
Contact Information:
Website: padelpark-dubai.com
Phone: +971 58 590 8921
Email: info@padelpark-dubai.com
Address: The Ripe MarketAcademy Park. Umm Suqeim, Dubai
Facebook: www.facebook.com/padelparkdubai
Instagram: www.instagram.com/padelparkdubai
9. The Lob
The Lob sits in Al Quoz on 15 Street and mixes padel with wellness in one spot. Indoor courts come high-quality for play at different levels, alongside studios that run movement classes like yoga or Pilates. Recovery options follow workouts, and events keep the place lively. The setup draws from Mexican padel vibes and Bali-style calm to create a balanced hangout. Community builds naturally through shared sessions and post-game time.
Players often stick around for more than just the court time. Bookings handle court slots directly. The wellness angle adds variety for those who want to combine sport with recharge. It’s tucked away but easy to reach in the industrial area.
Key Highlights:
Indoor padel courts
Multi-function studios for classes
Recovery options post-play
Wellbeing events regularly
Community-focused space
What’s on Offer:
Court bookings
Movement and wellness classes
Recovery sessions
Contact Information:
Website: thisisthelob.com
Email: info@thisisthelob.com
Instagram: www.instagram.com/thisisthelob
10. Club Padel Dubai
Club Padel Dubai keeps things comfortable with shaded outdoor courts that block the sun while still letting in natural light. The high ceiling gives plenty of room for lobs and overheads without feeling cramped. Courts stay playable even when temperatures climb, and the setup mixes that outdoor feel with some protection from heat or light rain. Players drop in for casual games or longer sessions, and the place welcomes beginners right alongside regulars. Booking happens straightforwardly for available slots.
The shaded design changes how sessions go compared to fully open spots. Maintenance keeps surfaces consistent, and the location fits well for people around that part of Dubai. Many who play there mention the comfort factor as what brings them back regularly. It stays simple – show up, play, enjoy without much fuss.
Key Highlights:
Shaded outdoor courts
High ceiling for play
Comfortable in hot weather
Mix of outdoor and covered feel
What’s on Offer:
Court bookings
Casual and regular play sessions
Contact Information:
Website: www.clubpadel.ae
Phone: +971 4 273 4431
Email: Info@clubpadel.ae
Address: 6B Street – Al Quoz – Al Quoz Industrial Area 3 – Dubai
LinkedIn: www.linkedin.com/company/club-padel-uae
Facebook: www.facebook.com/Clubpadeldubai
Instagram: www.instagram.com/clubpadeldubai
11. La Cantine Sports Club
La Cantine Sports Club sits on Bluewaters Island and pairs padel with a laid-back lifestyle setup. Six outdoor courts handle dedicated games or just social hits, surrounded by landscaped areas where people hang out before or after. The spot ties into the beach and hotel vibe nearby, so it feels connected rather than standalone. Dining draws from Mediterranean influences with options that work for quick bites or longer meals post-play. A retail boutique stocks gear, clothing, and accessories that match the overall aesthetic.
The combination makes it easy to turn a court session into a full outing. Courts stay open for various levels, and the social spaces encourage chatting or relaxing. Location on the island adds that scenic touch with water views close by. Players often note how the dining and retail round out the experience without forcing anything extra.
Key Highlights:
Outdoor courts on Bluewaters Island
Landscaped social areas
Mediterranean-inspired dining
Retail boutique for gear and apparel
What’s on Offer:
Court bookings
Post-play dining options
Retail shopping
Contact Information:
Website: lacantinesportsclub.ae
Phone: 045566623
Email: info@lacantinesportsclub.ae
Address: La Cantine Sports Club, La Cantine Beach, Delano Dubai, Bluewaters Island
Instagram: www.instagram.com/lacantinesportsclub
12. Just Padel
Just Padel spreads courts across different areas in Dubai to make access easier for players scattered around the city. The focus stays on welcoming all ages and skill levels into regular games or community sessions. Courts get maintained for consistent play, and the setup encourages people to come with friends or family. Booking covers standard slots, and the approach keeps building connections among players who stick around long-term.
Locations get chosen thoughtfully so sessions fit into daily routines without long drives. Customer service handles things smoothly to keep experiences positive. Many who use the spots talk about how the spread-out options help them play more often. It all circles back to making padel part of everyday life here.
Key Highlights:
Courts in multiple Dubai locations
Accessible for different areas
Welcoming to all skill levels
Community-building focus
What’s on Offer:
Court bookings
Casual play sessions
Family and group games
Contact Information:
Website: justpadel.ae
Phone: +971 55 9928 022
Email: info@justpadel.ae
Address: Just Play Sports Complex, 15A Street, Al Quoz Industrial 1 – Dubai
LinkedIn: www.linkedin.com/company/just-padel-ae
Facebook: www.facebook.com/Justpadelae
Instagram: www.instagram.com/justpadel_ae
13. Ballers By Gaby Reca
Ballers By Gaby Reca sits right in the Burj Khalifa District on Dubai Fountain Street, smack in the middle of Downtown. Courts open early morning through late night every day of the week, including holidays, so sessions fit pretty much any schedule. Amenities cover the basics like equipment rental if someone shows up without gear, changing rooms with lockers, free parking nearby, WiFi for staying connected, and disabled access to keep things inclusive. The spot runs through an online booking platform where availability shows up clearly for each court.
Location puts it convenient for people in central areas who want quick access without much travel. Players often mix casual rallies with more focused games here. The setup stays straightforward – reserve a slot, play, use the facilities as needed. Many note how the long hours make it easy to squeeze in a match after work or on weekends.
SIRO Padel Courts operate on the ground floor of One Za’abeel with three courts built for focused play. The setup ties into the building’s fitness and recovery focus, so players can head straight to a Refuel Bar afterward for something to eat or drink. An indoor co-working space sits nearby if anyone wants to handle work before or after a game. Recovery options in the same facility include things like cryotherapy for post-session recharge.
Courts get used for intentional training sessions rather than just casual hits. Booking happens directly for available times. The integration with other wellness areas makes it practical for people already in the building or those combining sport with recovery. It’s more performance-oriented than purely social.
Key Highlights:
Three courts in One Za’abeel
Refuel Bar for post-game
Indoor co-working space nearby
Recovery treatments available
What’s on Offer:
Court bookings
Padel sessions
Contact Information:
Website: www.sirohotels.com
Address: One Central, The Offices Building 2, 9th Floor, World Trade Centre Dubai, United Arab Emirates
Phone: +971 4 666 1717
Email: info.onezaabeel@sirohotels.com
Instagram: www.instagram.com/sirohotels
15. Casa Padel
Casa Padel combines courts with a community feel where people from beginners to experienced players mix in. Courts get reserved online for casual games or competitive matches, and matchmaking helps pair players by level. Weekly social tournaments keep things lively for those who enjoy a bit of structure. Coaching runs in individual or group formats with certified coaches covering technique, strategy, and positioning – sessions suit complete newcomers or folks sharpening their game.
The place emphasizes coming back regularly through events and a welcoming vibe. Aesthetics and comfort get attention so the environment feels balanced between sport and lifestyle. Players drop in for quick hits or longer training blocks. Many mention the social tournaments as a nice way to meet others.
Key Highlights:
Online court reservations
Matchmaking by skill level
Weekly social tournaments
Certified coaching programs
What’s on Offer:
Court bookings
Individual coaching lessons
Group training sessions
Social tournaments
Player matchmaking
Contact Information:
Website: casapadel.ae
Phone: +971 58 502 4712
Email: reception@casapadel.ae
Address: SMARK 2, OFF4-71, Ras Al Khor Industrial Second
Instagram: www.instagram.com/casapadel_club
Conclusion
Dubai’s padel scene keeps evolving at a crazy pace, and honestly, it’s one of those sports that just fits the city’s energy perfectly – fast, social, a little flashy, but still grounded in real fun on the court. Whether you’re chasing that perfect lob in the middle of summer heat (thank god for indoor and shaded options) or just looking to meet some like-minded people for a relaxed doubles match, the variety out there means there’s almost always something that clicks with how you want to play. Some spots lean hard into the wellness-recovery combo, others keep it super social with events and lounges, and a few hide in unexpected corners with killer views or quiet vibes.
At the end of the day, the right court is less about chasing perfection and more about what makes you want to come back week after week. Grab a friend (or four), book whatever slot fits your schedule, and get out there. Padel in Dubai isn’t just exercise anymore – it’s become one of those little rituals that make living here feel even better. So pick a place that feels right for you right now, hit the glass, and enjoy it. The game’s only getting bigger from here.
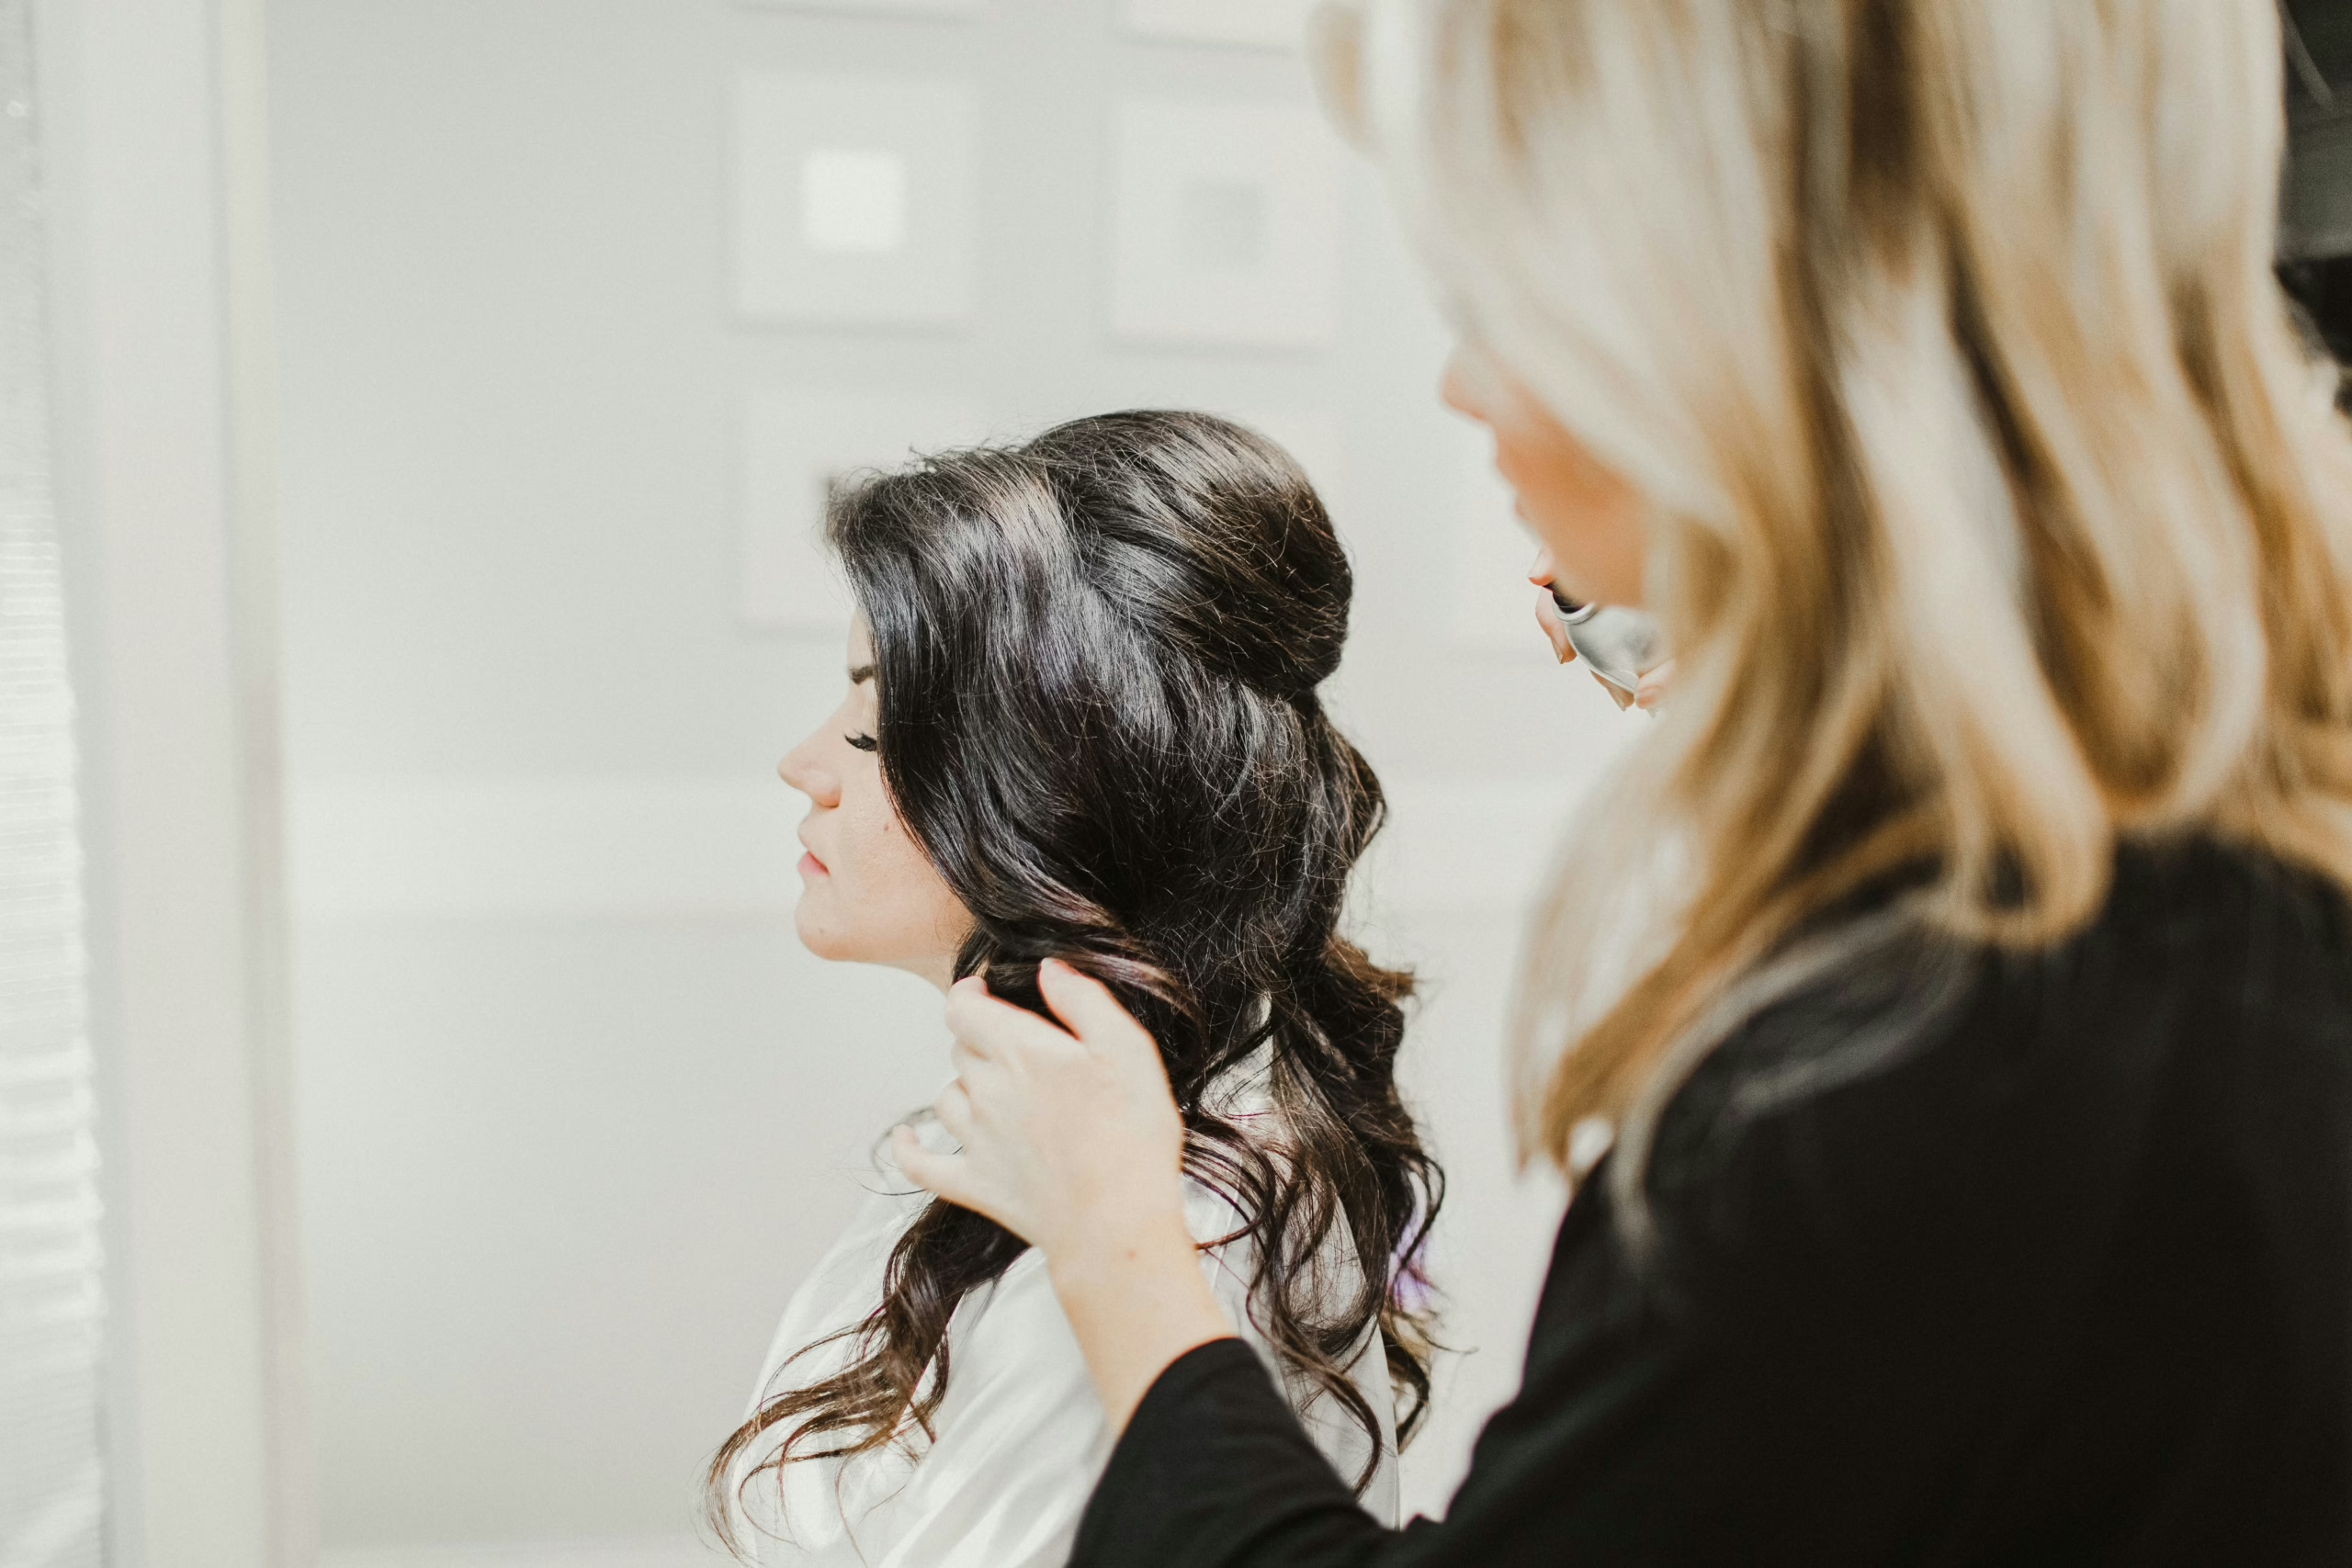
Dubai Silicon Oasis has a very specific rhythm. It is residential, work-focused, and quietly busy, which also shapes the kind of hair salons you find here. Most places are built around convenience and consistency rather than hype, catering to people who want good results without turning a haircut into a whole event.
This article is set up as a list, not a ranking. The goal is to walk through the types of hair salons you will come across in Dubai Silicon Oasis, what they usually do well, and who they tend to suit best. If you live or work nearby and want a reliable place you can come back to, this should help you narrow things down without overthinking it.
1. Ombre Salon
Ombre Salon in Dubai Silicon Oasis operates as part of a wider salon network with several branches across Dubai. Their setup reflects a multi service beauty salon rather than a hair only space, with hair work sitting alongside nails, skin, brows, lashes, and makeup. The team structure appears fairly large, which allows them to handle a steady daily flow without turning appointments into rushed sessions. Hair services are usually approached in combination with treatments, trims, or styling rather than isolated quick visits.
In day to day practice, Ombre Salon tends to attract clients who want consistency and familiarity. Much of their hair work revolves around color services, keratin treatments, highlights, and regular maintenance cuts. The salon environment is functional and calm, and the service model leans toward listening first, then advising within practical limits. It feels built for repeat visits rather than one off transformations.
Key Highlights:
Located within Dubai Silicon Oasis as part of a larger salon group
Offers hair services alongside nails, skin, brows, lashes, and makeup
Team based setup with multiple stylists and technicians
Focus on maintenance services like coloring, treatments, and trims
Who it’s best for:
Residents looking for a nearby all in one beauty salon
Clients who prefer regular hair maintenance in one familiar place
People combining hair appointments with nails or skin services
Contact information:
Website: ombresalon.net
Phone: +971 4 328 2044
Address: Binghatti Sapphire Building Shop no 1 and 2, Dubai Silicon Oasis- Dubai, UAE
Instagram: www.instagram.com/ombrebsalon
Facebook: www.facebook.com/ombrebsalon
2. Stella Beauty Salon
Stella Beauty Salon is based directly in Dubai Silicon Oasis and positions itself as a full service salon with a strong emphasis on structure and routine. Their service list covers hair, nails, grooming, facials, lashes, waxing, and massage, making it a place where clients often plan longer visits rather than quick stops. The salon places noticeable attention on cleanliness standards and organization, which shapes the overall experience.
From a hair perspective, Stella Beauty Salon focuses on practical salon services rather than trend driven styling. Haircuts, coloring, and treatments are integrated into a broader beauty routine, often booked alongside manicure or facial services. The team comes from mixed professional backgrounds, which gives the salon a balanced, straightforward working style rather than a single signature approach.
Key Highlights:
Located inside Dubai Silicon Oasis, Silicon Gate area
Full service salon covering hair, nails, grooming, and skin
Strong emphasis on hygiene and structured service flow
Hair services offered as part of broader beauty routines
Who it’s best for:
Clients who value cleanliness and order in a salon setting
People booking multiple beauty services in one visit
Residents working or living nearby who want predictable scheduling
Contact information:
Website: lamaisonstella.com
Phone: +971 4-333-9080
Address: Dubai Silicon Oasis, Silicon Gate 1 Building Plaza Floor
Twitter: x.com/lamaisonstella
Instagram: www.instagram.com/lamaisonstella
Facebook: www.facebook.com/lamaisonstella
3. Streaks Salon
Streaks Salon operates in Dubai Silicon Oasis as part of a large multi branch salon group with both ladies and men’s locations. Their DSO branch reflects the same format seen across their other salons, with defined service categories for hair, makeup, beauty treatments, and spa services. Hair work is treated as a core offering, covering cuts, coloring, and treatments within a more structured salon process.
What sets Streaks apart operationally is their layered setup. Alongside daily client services, the brand is also involved in professional training, which influences how procedures are standardized across branches. In the DSO location, this shows up as a consistent service flow rather than experimental styling. Appointments tend to follow clear steps, with consultations focused on suitability rather than dramatic change.
Key Highlights:
Dedicated Streaks branch located in Dubai Silicon Oasis
Separate ladies and men’s service structure across the brand
Covers hair, makeup, beauty treatments, and spa services
Operates within a standardized multi branch salon system
Who it’s best for:
Clients who prefer structured salon processes
People familiar with the Streaks brand from other locations
Those looking for consistent hair services without surprises
Contact information:
Website: streaksuae.com
Phone: +971 55 218 4663
Address: IT PLAZA – Nadd Hessa – Dubai Silicon Oasis – Dubai – United Arab Emirates
Instagram: www.instagram.com/streaksalons
Facebook: www.facebook.com/Streaks.salon
4. Companion Beauty Salon
Companion Beauty Salon operates in Dubai Silicon Oasis as part of a large salon and spa network with branches across multiple emirates. Their Silicon Oasis locations are positioned inside malls, which shapes the overall experience. Appointments tend to follow a steady, structured flow, with hair services offered alongside nails, massage, and general beauty treatments rather than as a standalone focus.
From a hair perspective, Companion works within a system built for volume and consistency. Services are standardized across branches, which means clients usually know what to expect regardless of location. Hair appointments are commonly combined with other treatments, making it a practical option for people who prefer handling multiple services in one visit rather than moving between salons.
Key Highlights:
Multiple branches in and around Dubai Silicon Oasis
Hair services offered alongside nails and massage
Mall based locations with predictable scheduling
Standardized service approach across branches
Who it’s best for:
Residents who want a nearby, easy to access salon
Clients combining hair with other beauty services
People who prefer familiar processes over experimentation
Contact information:
Website: www.companionbeautysalon.com
Phone: +971 (0) 4 252 1511
Address: 216 – 2nd Floor Madina Mall Al Quasis, Dubai, United Arab Emirates
5. Tips & Toes
Tips & Toes functions as a large scale salon and spa brand with a presence across Dubai and the wider region. While not limited to Silicon Oasis, their model reflects what clients can expect from a chain style salon serving residential areas. Hair services are one part of a broad menu that includes nails, skin care, massage, and grooming.
Their hair offering is positioned as routine care rather than trend led styling. Cuts, treatments, and maintenance work are handled within a structured appointment system, often alongside other services booked in the same visit. The overall experience leans toward reliability and familiarity, especially for clients who already use the brand in other neighborhoods.
Key Highlights:
Operates as a large salon and spa chain
Hair services integrated with nails, skin, and massage
Consistent service structure across locations
Focus on routine care rather than niche styling
Who it’s best for:
Clients already familiar with the Tips & Toes setup
Scintilla Women Salon is a standalone salon that operates with a more focused, in house setup. Unlike chain based salons, their structure centers on a single location and a fixed team, which shapes how services are delivered. Hair styling and treatments are offered alongside skin care, nails, and body treatments, but the pace feels more contained and appointment driven.
Hair services at Scintilla tend to sit between maintenance and occasion based styling. Clients may visit for routine cuts and treatments, but the salon also handles more deliberate styling sessions tied to events or personal refreshes. The overall environment supports longer appointments, where hair services are part of a broader self care visit rather than a quick stop.
Key Highlights:
Independent women only salon
Hair services combined with skin and body treatments
Appointment focused service flow
Single location with a fixed team
Who it’s best for:
Clients who prefer smaller, non chain salons
Women booking longer, planned appointments
Those combining hair with skin or body care
Contact information:
Website: scintilla.ae
Phone: +971 50 496 8829
Email: hello@scintilla.ae
Address: Shop no 13, Turtle Avenue, Near Dubai Land Residence Masjid, Dubailnd
Bianco Spa operates as a women focused beauty salon with a strong emphasis on atmosphere and routine care. Their setup leans toward calm, minimal interiors and a structured service flow, where hair services sit alongside skin and nail care rather than standing alone. Hair work here is framed as part of everyday grooming, with attention given to clean styling, healthy hair, and maintenance rather than frequent change.
From a hair salon perspective, Bianco tends to suit clients who value consistency and a controlled environment. Appointments feel planned and paced, with hair treatments and styling fitting into a broader self care visit. The salon approach reflects a preference for simplicity, where hair, skin, and nails are treated as connected parts of personal upkeep.
Key Highlights:
Women only salon environment
Hair services combined with skin and nail care
Calm, minimal interior style
Appointment based service flow
Who it’s best for:
Women who prefer a quiet, structured salon visit
Clients focused on hair maintenance rather than trends
Those combining hair care with skin or nail services
Contact information:
Website: biancospa.ae
Phone: +971 4 333 6166
Address: Cedre Villas Community Centre – Cedre Shopping Centre shop 24&26 – Dubai – United Arab Emirates
Cutting Edge Ladies Salon operates as a full service beauty salon where hair styling is one part of a wide service list. Their approach to hair focuses on styling, cuts, coloring, and treatments that fit into a general grooming routine. Hair appointments are usually part of longer visits, often paired with facials, nails, or body treatments.
The salon structure supports clients who want flexibility rather than a narrow focus. Hair services are handled by stylists working across different techniques, but the overall tone stays practical and familiar. It is less about experimenting and more about offering a predictable salon experience where clients know what they are coming in for.
Key Highlights:
Hair styling, cuts, and treatments offered in house
Wide range of supporting beauty services
Designed for longer, multi service visits
Straightforward salon setup
Who it’s best for:
Clients booking hair alongside other beauty services
Women who prefer one location for grooming needs
People looking for routine styling and care
Contact information:
Website: cuttingedgeladies.com
Phone: +971 52 630 2533
Address: Silicon Central Mall – D107, 1st Floor – Nadd Hessa – Dubai Silicon Oasis – Dubai – United Arab Emirates
Instagram: www.instagram.com/cuttingedgeladiesuae
9. Queen Code Beauty Salon & SPA
Queen Code Beauty Salon & SPA is based in Dubai Silicon Oasis and works as both an in salon and home service provider. Their hair services include treatments, coloring, and styling, offered either at the salon or delivered to the client’s home. This dual setup shapes how the salon operates, with flexibility playing a bigger role than fixed routines.
Within the salon itself, hair services are treated as part of a complete beauty visit, often paired with facials, nails, or body treatments. The home service option changes the dynamic further, allowing clients to treat hair care as something that fits around daily life rather than requiring a dedicated trip. This makes the experience more practical for residents of Dubai Silicon Oasis who value convenience.
Address: Shop #1, Summer Community Centre – Dubai – United Arab Emirates
Instagram: www.instagram.com/queencodesalon.dso
10. Brown Sugar Hair Salon
Brown Sugar Hair Salon, located in Dubai Silicon Oasis, focuses on providing a range of professional hair services, ensuring a healthy, shiny, and beautiful result. The salon’s approach is built on a deep understanding of various hair textures and the correct application of treatments and techniques. Their offerings include styling, coloring, braids, relaxers, texturizers, and repair treatments, all delivered with attention to the health of the hair. In addition to hair services, Brown Sugar also provides beauty treatments like manicures and pedicures, ensuring a full beauty experience.
The team at Brown Sugar focuses on combining expertise with creativity, offering a welcoming space for those who seek to enhance both the look and feel of their hair. With an emphasis on using the right products and techniques, the salon ensures that clients leave with hair that is not only styled but also nourished. Whether it’s a routine haircut, a coloring session, or specialized treatments like relaxers, Brown Sugar offers a comprehensive approach to hair care.
Key Highlights:
Located in Dubai Silicon Oasis
Offers hair styling, coloring, relaxing, and braiding services
Emphasis on healthy, shiny hair with expert care
Provides manicures and pedicures as part of a complete beauty experience
Who it’s best for:
Clients who want to maintain healthy hair while getting professional styling
Those looking for a full beauty experience, including nails and hair care
People who appreciate a knowledgeable team focused on product use and technique
Contact information:
Website: www.brownsugarme.com
Phone: +971 56 455 3792
Address: Shop R3, Park Terrace Tower Dubai Silicon Oasis, Dubai
When it comes to finding a reliable hair salon in Dubai Silicon Oasis, there are several options to consider, each offering something unique. Whether you’re after a quick trim, a bold new color, or even a full beauty overhaul with nails and skin services, the area has a range of salons that cater to different needs. Salons like Brown Sugar, with its focus on healthy hair and professional styling, are great choices for those who value expertise and the right techniques to keep hair looking its best.
Ultimately, the best salon for you will depend on what you’re looking for – whether it’s the convenience of a one-stop beauty experience, a quiet space for regular maintenance, or a salon where creativity meets professional care. Whatever your hair care goals may be, Dubai Silicon Oasis offers some solid spots to get pampered and leave feeling confident.
Dubai Creek Harbour has its own rhythm. It is quieter than downtown, more residential, and a bit more relaxed overall – and that carries over into the local beauty scene too. If you live here or spend a lot of time around the area, you probably want a hair salon that feels easy to visit, consistent, and not overhyped.
This article is set up as a list, not a sales pitch. The goal is to walk through hair salons in and around Dubai Creek Harbour and look at how they actually operate – from the vibe and services to the kind of clients they suit best. Whether you want something low-key for regular trims or a place you can trust with bigger changes, this list is meant to help you narrow things down without the noise.
1. Eden Blossom
Position themselves as a neighborhood-focused ladies salon in Dubai Creek Harbour, with hair services sitting alongside face, nails, and body care. The setup feels oriented toward regular visits rather than one-off appointments, with an emphasis on keeping things consistent and familiar for clients who live nearby. Hair services are treated as part of an overall routine, not a standalone luxury, which shapes how appointments are structured and paced.
When it comes to hair, they cover everyday needs like cuts, coloring, styling, and smoothing treatments. The approach appears practical and maintenance-driven, aiming to keep hair healthy and manageable over time. Their hours and location suggest they are set up for people fitting salon visits around work, family, and daily schedules rather than planning a whole day around it.
Key Highlights:
Ladies-only salon located in Dubai Creek Harbour
Hair services alongside face, nails, and body care
Focus on routine maintenance and personal style
Open daily with extended hours
Who it’s best for:
Residents of Dubai Creek Harbour looking for a nearby salon
Women who prefer one place for hair and basic beauty services
Clients who book regular trims, color upkeep, or treatments
Contact information:
Website: eden-blossom.com
Phone: +971 4 282 8080
Email: info@eden-blossom.com
Address: Dubai Creek Residences, South Tower 2 – Dubai – United Arab Emirates
Facebook: www.facebook.com/edenblossomdxb
Instagram: www.instagram.com/eden.blossom
2. LaLoge Beauty Lounge
They operate as a full-service beauty lounge with multiple locations in Dubai, catering to both women and men. The environment leans more toward a polished, structured salon experience, with attention given to interiors, privacy, and service flow. Hair services are part of a broader menu that includes grooming and skin-focused treatments.
In terms of hair care, they appear to focus on salon-standard cuts, styling, and treatments rather than quick walk-in services. The availability of private rooms suggests they are used by clients who value discretion or longer, more involved appointments. Their Creek Harbour proximity may vary by location, but they are often considered by residents willing to travel a short distance for a familiar setup.
Key Highlights:
Beauty lounge serving both women and men
Multiple Dubai locations with similar service structure
Hair services combined with grooming and skin care
Option for private treatment rooms
Who it’s best for:
Clients who prefer a structured salon environment
People booking longer or more private appointments
Those open to traveling slightly outside Creek Harbour
They are set up specifically as a men’s barbershop, with a strong focus on haircuts, beard work, and grooming routines. Their operations are built around consistency, hygiene standards, and repeat visits rather than experimental styling. While not exclusive to Dubai Creek Harbour, they are commonly used by residents who prioritize predictable results.
Hair services here are straightforward and barber-led, covering classic and modern cuts, beard trims, and basic treatments like coloring or keratin. The experience is designed to be efficient and familiar, with many clients sticking to the same barber over time. It functions more as a grooming stop than a beauty destination.
Key Highlights:
Men-focused barbershop concept
Emphasis on hygiene and routine grooming
Haircuts, beard trims, and basic treatments
Multiple locations across Dubai
Who it’s best for:
Men looking for regular haircuts and beard maintenance
Clients who value consistency over experimentation
Residents comfortable traveling outside Creek Harbour for grooming
Contact information:
Website: www.chapsandco.com
Phone: 04 568 6750
Address: Office 1406, Mazaya Business Avenue, Jumeirah Lake Towers, Dubai, UAE
They operate as a men-focused grooming lounge built around traditional barbering habits rather than quick turnover. The way they describe their work suggests a slower pace, with time set aside for consultation before any haircut or shave begins. Hair services are treated as part of overall grooming, with attention given to scalp condition, beard balance, and daily upkeep, not just the final look.
Their style leans toward classic and clean, with room for fades and modern cuts when requested. The Italian barbering influence shows up in how services are structured, mixing haircuts with shaving, facial care, and short relaxation elements. While they do not have a branch directly inside Dubai Creek Harbour, they are often considered by residents who are comfortable traveling for a familiar men-only setup.
Key Highlights:
Men-only grooming lounge
Focus on classic haircuts, fades, and beard care
Consultation before hair and grooming services
Hair services combined with shaving and facial care
Who it’s best for:
Men who prefer barber-style haircuts over unisex salons
Clients who value routine grooming and consistency
Creek Harbour residents willing to travel for a dedicated gents salon
Contact information:
Website: www.barberiaitalianadubai.com
Phone: +971 4570 6722
Address: Palace – Shop 01 – Al Kheeran First – Dubai Creek Harbour – Dubai – Emirati Arabi Uniti
They present themselves as a full-service salon that treats hair care as part of a broader beauty routine. Hair services sit alongside nails, facials, makeup, and body treatments, which makes the experience feel more like regular self-care than a single-purpose visit. The atmosphere appears practical and familiar, with many clients returning on a monthly or bi-weekly basis.
For hair, they focus on everyday needs such as cuts, coloring, and treatments aimed at keeping hair manageable over time. The way their services are laid out suggests they are used by people who prefer maintenance and gradual changes rather than dramatic restyling. While their locations are spread across Dubai rather than centered in Creek Harbour, they are often part of the wider search for nearby salons.
Key Highlights:
Full-service salon with hair and beauty treatments
Haircuts, coloring, and routine hair care
Designed for repeat visits and regular maintenance
Part of a wider salon network in Dubai
Who it’s best for:
Women looking for hair care alongside other beauty services
Clients who book regular trims and treatments
Creek Harbour residents open to nearby areas
Contact information:
Website: beautyroomspa.com
Phone: +971 4 326 3601
Email: INFO@BEAUTYROOMSPA.COM
Address: Beauty Room Salon & Spa Waha Community Commercial Commercial Block E First Floor Office Number: 1011, Dubai, UAE
Facebook: www.facebook.com/beautyroomspa
Instagram: www.instagram.com/beautyroomspa
6. Tips & Toes
They operate as a large salon and spa chain with standardized services across multiple locations. Hair services are one part of a broad menu that includes nails, skin care, grooming, and massage, which shapes the overall experience. Appointments tend to follow a clear structure, making it easy for clients to know what to expect from visit to visit.
Their hair offerings are positioned around upkeep rather than trend-driven styling. Cuts, treatments, and basic styling are designed to fit into regular schedules, especially for people balancing work and home life. While not every branch is close to Dubai Creek Harbour, the brand often comes up when residents look for established salons with predictable service formats.
Key Highlights:
Large salon and spa chain
Hair services combined with nails, skin, and grooming
Structured appointment flow
Multiple locations across Dubai and nearby areas
Who it’s best for:
Clients who prefer a familiar, standardized salon setup
People combining hair appointments with other services
Creek Harbour residents looking beyond immediate walking distance
Contact information:
Website: www.tipsandtoes.com
Phone: +971 (0) 4 399 0550
Address: 3rd Floor, Al Faris Building, Arjan, Barsha South, Dubai, United Arab Emirates
They operate as a multi-branch beauty salon and spa with hair services positioned as part of a broader routine rather than a standalone visit. Hair sits alongside nails, massage, and general beauty care, which shapes how people tend to use the salon. Appointments often feel practical and scheduled, aimed at keeping things consistent rather than changing styles often.
Their hair services focus on everyday needs such as cuts, basic styling, and maintenance treatments. The setup works well for clients who like having several services available in one place and prefer familiar processes from visit to visit. While there is no dedicated branch inside Dubai Creek Harbour, they are part of the wider pool of salons residents often consider when looking nearby.
Key Highlights:
Hair services combined with nails and spa treatments
Multiple branches across Dubai and nearby emirates
Structured appointments focused on upkeep
Salon format designed for repeat visits
Who it’s best for:
Clients who prefer one place for hair and beauty care
People booking regular maintenance appointments
Dubai Creek Harbour residents open to nearby areas
Contact information:
Website: www.companionbeautysalon.com
Phone: +971 (0) 4 252 1511
Address: 216 – 2nd Floor Madina Mall Al Quasis, Dubai, United Arab Emirates
8. Milyne Aesthetic Center
They are structured more as an aesthetic and skin-focused center, with hair playing a limited role compared to other treatments. The environment and service layout suggest longer appointments and planned sessions rather than quick salon visits. Hair-related care, when included, tends to sit closer to scalp health and treatment-based routines than styling.
Because of this setup, they are sometimes considered by people who approach hair care from a treatment or condition perspective rather than styling alone. For Dubai Creek Harbour residents, it fits a specific need rather than everyday salon use, especially for those already booking skin or body treatments in the same visit.
Key Highlights:
Treatment-focused beauty and aesthetic center
Hair care linked more to scalp and therapy routines
Appointment-based with longer session times
Calm, clinic-style environment
Who it’s best for:
Clients focused on treatment-driven hair care
People combining hair and skin services
Those looking beyond standard haircut routines
Contact information:
Website: www.milyne.ae
Phone: 052 117 9436
Email: info@milyne.ae
Address: Dubai Creek Residences – Ground Floor Ras Al Khor – Dubai Creek Harbour – Dubai
They run as a ladies-only beauty lounge where hair services are part of a broader beauty menu. The way the salon presents itself suggests regular visits for grooming and upkeep rather than occasional styling sessions. Hair care is grouped with threading, waxing, facials, and nail services, which makes visits feel familiar and routine.
Hair services here are generally practical, covering trims, basic styling, and maintenance work that fits into everyday schedules. While not positioned specifically within Dubai Creek Harbour, they often appear in local searches for nearby salons, especially for residents willing to travel a short distance for a known setup.
Key Highlights:
Ladies-only beauty lounge
Hair services combined with facial and grooming care
Focus on routine maintenance
Clear service structure for regular visits
Who it’s best for:
Women looking for simple, consistent hair care
Clients combining hair with other beauty services
Dubai Creek Harbour residents exploring nearby salons
Contact information:
Website: www.glossandglam.ae
Phone: +971547006284
Email: customercare@glossandglam.ae
Address: Building E1, Al Wasl Green Park, Opt to Samari Residence, Ras Al Khor – Dubai
Facebook: www.facebook.com/glossandglams
Instagram: www.instagram.com/glossandglams
Conclusion
Finding a hair salon around Dubai Creek Harbour usually comes down to how you live, not what sounds good on paper. Some people want a place they can drop into regularly without overthinking it, while others are fine going a bit further for a setup they already trust. That mix is what defines the area. It is practical, residential, and built around routine rather than trends.
The salons covered here show that there is no single right choice. What matters is whether the place fits your schedule, your habits, and how much effort you want to put into hair care. Once those line up, the rest tends to fall into place, and your salon stops being a decision and just becomes part of the week.
In busy Dubai, finding time for a salon visit can be a real challenge. Traffic, queues, and packed schedules often get in the way. That’s why at-home hair salon services have become so popular. Top providers bring experienced stylists straight to your home or hotel, transforming your space into a private salon. You’ll get the same premium treatments-precise cuts, perfect blowouts, fresh color, keratin smoothing, elegant updos-without ever leaving the house. Professionals arrive fully equipped with high-end products and tools, ready to deliver personalized service tailored to your hair type and style. Clients love the relaxed atmosphere: enjoy your coffee in comfort, play your favorite music, or simply unwind. Hygiene standards are top-notch, with sterilized equipment and quality products. Plus, flexible booking-many offer evenings, weekends, or even 24/7 availability- makes it easy to fit into any routine. Dubai’s leading at-home hair services are a favorite among busy professionals, parents, visitors, and anyone who wants expert care without the hassle of going out. It’s convenience and luxury combined- hard to beat.
1. Nooora
Nooora provides on-demand at-home beauty services in Dubai, including a range of hair treatments. Professionals arrive at the client’s location with all necessary tools and products, covering the city from 10 am to 10 pm every day. Booking happens through WhatsApp, and services focus on convenience for clients who prefer not to visit a traditional salon.
Hair options include blow dry, botox treatment, keratin treatment, protein treatment, hair rebonding, deep conditioning, and styling such as updos or braids for different occasions. Many clients appreciate the variety in hair care, from restorative treatments to quick styling. The approach suits busy schedules, with professionals handling everything from basic care to more intensive repairs.
Key Highlights:
Available daily from 10 am to 10 pm
Covers all areas of Dubai
Booking via WhatsApp
Over 200 services total
Qualified professionals
Services:
Blow dry
Hair botox treatment
Keratin treatment
Protein treatment
Hair rebonding
Deep conditioning
Hair styling
Contact Information:
Website: nooora.ae
Phone: +97145586532
Facebook: www.facebook.com/nooora.ae
Instagram: www.instagram.com/nooora.ae
2. 24Beauty
24Beauty delivers on-demand beauty services around the clock in Dubai and Abu Dhabi, with hair as one of the main categories. Experts come directly to homes or offices, bringing professional tools for a full salon experience without travel. The focus stays on flexibility, especially for late nights or early mornings.
Hair services cover cutting, coloring, extensions, blowouts, and various treatments. Some packages include multiple sessions for ongoing styling. Clients often choose these for quick touch-ups or bigger changes like color transformations.
Key Highlights:
Available 24/7
Covers Dubai and Abu Dhabi
Same pricing for home or salon
Skilled hairdressers
Upcoming Beauty Map App in development
Services:
Hair cutting
Hair coloring
Hair extensions
Blowouts
Hair treatments
Contact Information:
Website: www.24beauty.ae
Phone: +971522031830
Instagram: www.instagram.com/24beauty.ae
3. Ruhee
Ruhee offers mobile beauty services in Dubai since 2021, bringing treatments to homes or hotels across the city. The team uses high-quality products and follows strict hygiene practices. Services run daily from morning to evening, with bookings handled via WhatsApp.
Hair services focus mainly on treatments and styling, including keratin, rebonding, color options, and updos. Some options cater specifically to kids. Professionals consult before starting to match client needs.
Nboutique delivers home salon services for ladies in Dubai, including hair treatments as part of their beauty offerings. Professionals come to the doorstep for various services, making it easy to book anytime. The focus stays on comfort and accessibility for clients.
Hair options include cuts, styling, and treatments tailored to personal preferences. Services suit regular upkeep or special preparations. Clients often reach out for quick consultations before appointments.
Key Highlights:
Ladies-only home services
Doorstep delivery in Dubai
Easy booking by call
Variety of beauty options
Services:
Haircut
Hair styling
Hair treatments
Contact Information:
Website: nboutique.ae
Phone: +971 56 111 1017
Email: customercare@nboutique.ae
Address: 201 Sama Tower, Sheikh Zayed Road Dubai, United Arab Emirates
Facebook: www.facebook.com/NBoutique.ae
Instagram: www.instagram.com/nboutiquedubai
5. Dream Touch
Dream Touch provides at-home beauty services in Dubai, including several hair treatments as part of their offerings. Specialists use current techniques for cutting, coloring, and smoothing, often as part of customized packages. The service runs daily with flexible timing to fit different schedules.
Hair services focus on practical fixes like blow dries, keratin treatments, and basic cuts or color work. Some packages bundle hair wash or protein treatments for added care. It suits clients looking for manageable routines or quick glam touches without leaving home.
Key Highlights:
Available 24/7 with daily hours from 10 am to 10 pm
Covers Dubai and nearby areas
Free consultation
Customized packages
Booking via call or WhatsApp
Services:
Hair cutting
Hair color
Hair keratin treatment
Hair blow dry
Contact Information:
Website: dreamtouch.ae
Phone: +971586357301
Email: info@dreamtouch.ae
Address: Al Faris Mall, Shop M03 Dubai
Facebook: www.facebook.com/dreamtouchdubai
Instagram: www.instagram.com/dreamtouchdubai
6. Justlife
Justlife offers women’s salon services at home across the UAE, with a few focused hair styling and treatment options available. Professionals bring tools for quick styling sessions or restorative care. Booking happens fast through their app or site, keeping things straightforward.
Hair services stick to blow dries in different styles, plus iron straightening and a L’Oréal spa treatment for damage repair. These work well for touch-ups or adding shine and volume. The options remain limited compared to full salon menus but cover essentials for home convenience.
Key Highlights:
Bookable in about 60 seconds via app or website
Covers UAE including Dubai
Hygienic practices with quality tools
Focus on women’s services
Services:
Blow dry short hair
Blow dry long hair
Blow dry with curls
Hair straightening with iron
L’Oréal hair spa treatment
Contact Information:
Website: www.justlife.com
LinkedIn: www.linkedin.com/company/justlifemena
Twitter: x.com/justlifeuae
Instagram: www.instagram.com/justlifeuae
7. Zieda Beauty Lounge
Zieda Beauty Lounge brings home beauty services to Dubai, including a variety of hair treatments and styling. Therapists and stylists arrive with portable equipment and salon-grade products, customizing based on client needs after a quick consult. Hygiene gets priority with full sterilization of tools.
Hair services include cuts, coloring, extensions, blow dries, updos, and general care. Options range from precision styling to adding volume or vibrant color. The approach fits well for those wanting tailored results in a comfortable setting.
Key Highlights:
Home appointments across Dubai
Advance booking recommended
Customized consultations
Strict hygiene protocols
Portable salon setup
Services:
Haircuts
Hair styling (including blow dry and updos)
Hair coloring
Hair extensions
Haircare treatments
Contact Information:
Website: ziedabeautylounge.com
Phone: +971 54 247 0730
Email: reception@ziedabeautylounge.com
Address: Villa 7, Jumeirah Beach Rd., Jumeirah 1, Dubai, UAE
Feel Pink brings a full lineup of home beauty services to clients in Dubai, including several hair-focused options. Beauticians arrive with everything needed for treatments, keeping things convenient and hygienic while working around personal schedules. The service covers a mix of everyday care and more involved styling.
Hair treatments include blow dry sessions, various hairstyling techniques, and full hair coloring. Options suit different looks, from quick blowouts to complete color changes. Many find it handy for maintaining hair without the trip to a salon.
Mauve Beauty Salon offers home salon services in Dubai, with hair styling and treatments as part of the mix. Certified professionals handle appointments at the client’s location, focusing on customized care for busy lifestyles. The setup emphasizes relaxation and convenience right at home.
Hair services cover blow dry, hairstyling, and basic treatments to refresh or maintain hair. Some clients pair these with other pampering options for a full session. It works well when you want professional results without leaving the house.
Key Highlights:
Home appointments in Dubai
Customized treatments
Hygienic and safe practices
Easy booking process
Services:
Blow dry
Hairstyling
Hair treatments
Contact Information:
Website: mauvebeautysalon.com
Phone: +971 52 947 0190
Email: info@mauvebeautysalon.com
Instagram: www.instagram.com/mauve.beauty.salon
10. SAbeauti Professional Ladies Salon
SAbeauti Professional Ladies Salon provides beauty services both in-salon and at home in Dubai, with a good selection of hair care options. Skilled staff deliver treatments using quality products, available for various occasions or regular upkeep. The service extends to doorstep delivery across the city.
Hair offerings include cuts, coloring, protein treatments, keratin applications, and masks or spa sessions for repair. Styling like updos or blow dries also feature prominently. Many clients appreciate the flexibility for special events or everyday needs.
Key Highlights:
Available at home or in-salon
Daily operating hours
Focus on ladies’ services
Professional staff
Services:
Haircut
Hair color
Protein treatment
Keratin treatment
Hair mask
Hair spa
Blow dry
Updos
Contact Information:
Website: sabeautisalon.com
Phone: +971 4 2699700
Email: info@sabeautisalon.com
Address: Dubai International Bowling Center, Al Mamzar – Deira – Dubai , UAE
Facebook: www.facebook.com/SabeautiSalon
Twitter: x.com/SAbeautiSalon
Instagram: www.instagram.com/sabeautisalon
11. Balinese Salon
Balinese Salon delivers home service beauty treatments for women across Dubai and the UAE, including hair options among their extensive list. Technicians bring certified skills and high-quality products to homes, offices, hotels, or other locations. The service accommodates various occasions with a focus on comfort.
Hair services feature blow dry, brushing, keratin treatments, and general hair care. Styling covers everyday looks or event prep. Clients often choose these for convenience during busy times or special days.
Key Highlights:
Service anywhere in UAE
Certified technicians
High sanitation standards
Affordable pricing
Services:
Blow dry
Brushing
Hair treatment
Keratin treatment
Contact Information:
Website: www.balinesesalon.com
Phone: +971 58 875 1112
Email: salonbalinese@gmail.com
12. SAB Beauty Concierge
SAB Beauty Concierge offers luxury home service beauty treatments in Dubai, with hair treatments included among their options. Certified experts arrive at the client’s home equipped with high-quality products for personalized sessions. The service covers various areas like Downtown Dubai, Jumeirah, and Palm Jumeirah.
Hair treatments focus on care and styling suited to individual needs, often as part of event prep or regular maintenance. Clients can combine these with other services for a complete experience. Many appreciate the convenience of having professionals handle everything on-site.
Key Highlights:
Doorstep service in Dubai
Certified beauty experts
High-quality products
Hygiene focused
Tailored sessions
Services:
Hair treatments
Hair styling
Contact Information:
Website: www.sabbeautyconcierge.com
Phone: 971561314035
Email: info@sabbeauty.com
Address: Sheikh Mohammed bin Rashid BlvdDubai Mall
13. Fly Barber
Fly Barber provides mobile barber services for men in Dubai and Abu Dhabi, bringing haircuts directly to homes, offices, hospitals, or other locations. Professional barbers with years of experience handle the cuts using their own tools. The setup saves time by eliminating trips to a traditional barbershop.
Hair services center on standard haircuts with flexibility in timing and place. Options work well for everyday grooming or special occasions like weddings. Many clients like the straightforward booking and on-the-go convenience.
Key Highlights:
Service in Dubai and Abu Dhabi
Professional barbers
Online booking available
Flexible locations
Services:
Haircut
Contact Information:
Website: flybarberuae.com
Phone: 050 525 33 22
Email: flybarberuae@gmail.com
Facebook: www.facebook.com/flybaberuae
Twitter: x.com/flybarberuae
Instagram: www.instagram.com/flybarberuae
Conclusion
At the end of the day, getting your hair done at home in Dubai has really changed the game for a lot of people. No more stressing over traffic, fighting for a parking spot, or sitting in a busy salon chair when you’d rather be chilling at home. These services bring the whole experience straight to your door, with pros who know their stuff and can handle anything from a quick blow-dry to a full color refresh or keratin treatment.
What stands out most is how flexible everything feels now. Whether you’re juggling work, kids, or just don’t feel like going out, you can book something that fits your schedule-sometimes even late at night or on short notice. It’s that kind of ease that makes you wonder why we ever put up with the old routine. Sure, it might cost a bit more than a regular salon visit, but for the time and hassle it saves, a lot of folks say it’s worth every dirham. If you’re someone who values good hair days without the drama of getting there, trying an at-home hair service in Dubai is honestly one of those small upgrades that makes life feel a little more luxurious. Give it a shot next time you need a trim or a style boost-you might never go back to the old way.
Traveling through Dubai International Airport can be hectic, but a quick stop at one of the top hair salons makes all the difference. Whether you’re after a fresh blow-dry, a neat trim, or just some styling to look sharp before your flight, the airport’s leading beauty spots deliver professional results without eating up too much time. These standout providers operate in key terminals, offering everything from express services to more indulgent treatments, so passengers can board feeling polished and refreshed.
1. Timeless Spa
Timeless Spa is a spot where travelers passing through Dubai International Airport often stop for a quick refresh. Hair services focus mainly on styling and cuts, with professional stylists handling everything from blow-dries to shaping. The setup sits inside the Dubai International Hotel area in Terminal 3, spread across different concourses, so it’s easy to reach during a layover. Appointments usually make sense here since walk-ins can get busy.
Manicure and pedicure options pair nicely with the hair treatments, and the overall vibe leans toward quick but thorough pampering before boarding. Some services come complimentary for certain lounge access or classes of travel, while others carry a charge. It’s a practical choice for anyone wanting to look put-together without too much hassle.
Key Highlights:
Located in Terminal 3 at Dubai International Hotel
Professional stylists handle hair services
Combines hair with nail care
Some treatments available in lounges
Open for appointments and walk-ins
Services:
Hair shaping with blow dry
Professional blow dry
Hair styling for men
Beard trimming and shaving
Manicure and pedicure
Various massage options
Contact Information:
Website: dubaiairportspa.com/timeless-spa
Facebook: www.facebook.com/beyondlounges
Instagram: www.instagram.com/beyondlounges
2. Be Relax
Be Relax offers relaxing spa services right at Dubai International Airport – travelers can visit multiple convenient locations in the terminals for a quick refresh or full pampering session. Hair styling pops up as a core service, covering washes, blow-dries, and haircuts when time allows. Multiple locations in Terminal 3 and one in Terminal 1 make it convenient depending on the gate. Therapists aim to get things done efficiently so passengers feel ready for the next leg of the trip.
The setup keeps things straightforward with a mix of beauty and wellness. Walk-ins work fine most times, though booking ahead helps avoid waits. It’s all about grabbing a bit of relaxation without straying far from the departure area.
Key Highlights:
Multiple locations in Terminal 3 and Terminal 1
Hair styling available at several spots
Focus on quick, travel-friendly services
Open 24/7 in most locations
Services:
Hair wash
Blow dry
Haircut
Massages
Nail care
Showers
Waxing
Contact Information:
Website: berelax.com
LinkedIn: www.linkedin.com/company/be-relax
Facebook: www.facebook.com/berelaxspa
Instagram: www.instagram.com/berelax_spa
3. Adrian D Salon
Adrian D Salon sits inside the Millennium Airport Hotel in Al Garhoud, close to Dubai International Airport. Hair services include cuts and styles for both men and women, along with color treatments when someone wants a refresh. The space feels modern and welcoming, with a focus on delivering clean, trendy looks that suit different preferences.
Clients often drop in for quick grooming or something more involved like styling. It’s practical for travelers staying nearby or those with time before a flight. Appointments help keep things smooth, though walk-ins happen too depending on the day.
Key Highlights:
Located in Millennium Airport Hotel, Al Garhoud
Unisex services for men and women
Focus on trendy cuts and styling
Color treatments available
Modern welcoming space
Services:
Cut and style
Men’s haircuts
Color treatments
Styling
Contact Information:
Website: www.adriandsalon.com
Address: Millennium Airport Hotel Dubai Casablanca St Al Garhoud – Dubai
URS Gents Salon caters mainly to men and sits in the Airport View Building in Al Garhoud. Haircuts come in various styles, from basic trims to more detailed shaping. Beard services round out the grooming side, with options for shaves and trims that many guys appreciate.
The setup keeps things relaxed yet professional, so it’s easy to pop in for a quick fix. Hours run consistently from morning to evening every day. It’s a straightforward choice for anyone looking for classic barbering without much fuss.
Address: Shopping Centre, Airport View Building, 35th Street, Garhoud, Dubai
5. Girl Gossip Beauty Salon
Girl Gossip Beauty Salon is in Al Garhoud for a range of hair work, from cuts to coloring and deep treatments. The atmosphere stays warm and relaxed, which makes it a nice place to unwind. Stylists handle everything from everyday looks to something more special.
It’s conveniently positioned near the airport, so many travelers stop by during layovers or before heading out. Services extend to styling that can include washes and conditioning. Booking ahead often works best here.
Key Highlights:
Situated in Al Garhoud, near Dubai International Airport
Hairdressing for women
Welcoming atmosphere
Variety of hair treatments
Services:
Haircuts
Coloring
Styling
Hair treatments
Deep conditioning
Hair wash
Contact Information:
Website: girlgossip.ae
Phone: +971 58 186 8528
Email: drrachna_kunder@yahoo.com
Address: Aloft hotel Ground Floor Garhoud Dubai United Arab Emirates
Facebook: www.facebook.com/girlgossipdubai
Instagram: www.instagram.com/girlgossipdubai
6. Chique Spa
Chique Spa is ladies-only spot which operates in Al Garhoud, about 1.5 km from the airport. Hair services cover cuts, shampoos, and styling for different lengths and textures. Extensions and keratin treatments add options for those wanting longer-lasting changes.
The focus stays on customized care in a comfortable setting. Therapists aim for quality results that feel natural. It’s geared toward women seeking a full beauty experience.
Key Highlights:
Ladies salon in Al Garhoud
Hair cut, shampoo, and style
Keratin protein treatments
Hair extensions available
Services:
Hair cut and style
Hair extension
Keratin protein hair treatment
Highlight, color, and foil combo
Contact Information:
Website: www.chiquespa.com
Phone: +971 4 282 2424
Email: info@chiquespa.com
Address: Al Garhoud, Opposite choithrams Supermarket, Villa 50 B 31A Dubai
Facebook: www.facebook.com/chiquebeautygarhoud
Instagram: www.instagram.com/chiquebeautygarhoud
7. Hype Salon UAE – Garhoud
Hype Salon UAE near GGICO Metro Station in Garhoud, this salon draws people in for solid hairstyling. Cuts and coloring handle everyday needs or bigger transformations. Stylist Tasleem gets mentioned a lot in reviews for attention to detail.
The vibe feels friendly and professional, with a mix of hair and other beauty work. Prices come across as reasonable for the quality. It’s accessible for locals and visitors alike.
Key Highlights:
Located near GGICO Metro Station, Garhoud
Known for hairstyling
Friendly professional atmosphere
Personalized hair care
Services:
Haircuts
Coloring
Hairstyling
Facials
Manicures
Contact Information:
Website: hype-salon-uae-garhoud.wheree.com
Phone: +971 9714-227-3030
Address: GGICO METRO STATION street Dubai United Arab Emirates
8. Streaks Gents Salon
Streaks Gents Salon sits in Al Nahda 1, Dubai, inside the Al Banai Building. The spot handles men’s haircuts with an emphasis on fades and classic styles. Beard sculpting and trimming come as standard options for a full grooming session.
It’s set up as a relaxed space where guys can get a trim or something more detailed. Hours stretch late into the evening most days. The location works well for locals or anyone passing through that part of the city.
Address: Al banai building, Al Nadha 1, Al Qusais, Al Qusais 1, Dubai
Conclusion
Wrapping up a layover in Dubai Airport with a fresh haircut or a quick blow-dry can totally change how you feel stepping onto your next flight. These hair spots scattered around the terminals make it surprisingly easy to squeeze in some self-care without stressing about time or location. Whether you’re dealing with a long wait or just want to look sharp before landing, there’s usually something open and ready when you need it. At the end of the day, it all comes down to what fits your schedule and vibe. A simple trim, a style refresh, or even just a wash and blow-out – any of these can make the difference between feeling rumpled and feeling put-together. So next time you’re transiting through DXB, keep an eye out for one of these salons. A little pampering mid-journey never hurt anyone, right? Safe travels!