
Not everyone wants to deal with knives, candle wax, and pumpkin guts all over the table. That is where painted pumpkins quietly win. They let you play with color, patterns, and small details without the stress of carving or the pressure to make everything spooky. You can go bold, minimalist, funny, or oddly artistic, and if it does not work out, a fresh coat of paint usually fixes it.
Painted pumpkin ideas are also one of those rare fall projects that work for almost everyone. Kids can handle simple shapes and faces, while adults can lean into cleaner designs, muted tones, or unexpected themes. Whether you are decorating a porch, setting up a fall centerpiece, or just looking for something creative to do on a quiet afternoon, painting pumpkins feels relaxed and flexible. There is no single right way to do it, and that freedom is kind of the point.
1. Crayon Drip Pumpkins
Start with a painted pumpkin as a base, usually in a light or neutral color so the drips stand out. Old crayons are unwrapped, broken into small pieces, and placed near the top of the pumpkin. Using a hair dryer on low heat, they slowly melt the crayons and let the wax run down the sides. Turning the pumpkin as the wax moves helps control where the color flows and keeps the design from looking too planned.
What makes this idea appealing is how unpredictable it feels. The melted wax does most of the work, and no two pumpkins end up looking the same. It is more about watching how the colors mix and drip than trying to follow a strict pattern, which takes some pressure off the process.
Key Highlights:
- Uses leftover crayons that might otherwise be thrown away
- Melted wax creates natural, uneven color drips
- Each pumpkin turns out slightly different
- Works best on painted or light-colored pumpkins
Who it’s best for:
- People who enjoy loose, experimental designs
- Households with older kids who can handle heat safely
- Anyone looking for a low-effort but visually interesting result
2. Pom Pom Pumpkins
Begin by painting pumpkins in solid, bright colors and letting them dry fully. Once the base is ready, pom poms in different sizes and colors are attached using hot glue. Some arrange them into flower shapes, while others space them out evenly to create simple dot patterns across the surface.
This idea leans more toward texture than paint detail. The pom poms add a soft, raised look that changes how the pumpkin feels as much as how it looks. It is less about precision and more about placement, which makes it easy to adjust the design as they go.
Key Highlights:
- Combines paint with simple craft materials
- Adds texture instead of relying only on color
- Designs can be changed or expanded easily
- No fine brush work required
Who it’s best for:
- Families working on pumpkins together
- People who prefer hands-on decorating
- Anyone who wants a playful, non-spooky look
3. Face Mask Pumpkins
Paint the pumpkin in a single color, keeping the surface clean and simple. A sleeping mask or face mask is then placed over the front and secured with pins. The result looks calm and slightly humorous, like the pumpkin has decided to rest instead of participate in Halloween chaos.
This idea works because it relies on contrast. The smooth painted surface paired with a familiar object gives the pumpkin personality without much effort. It feels more like visual humor than a craft project, which makes it easy to set up and display.
Key Highlights:
- Very few steps from start to finish
- Uses everyday items instead of craft supplies
- Focuses on mood rather than detail
- Easy to remove or swap masks
Who it’s best for:
- People short on time
- Minimalists who like simple ideas
- Decorators looking for something quietly funny
4. Creepy Cat Eye Pumpkin
Start by painting a small pumpkin in matte black and letting it dry fully. Once the surface is set, small holes are made across the pumpkin using a screwdriver or similar tool. Plastic cat eyes are then pressed into the holes, creating the effect of eyes staring out from the dark surface. The result is simple but unsettling, without relying on carving or detailed painting.
What stands out about this idea is how much it does with very little. The black base keeps attention on the eyes, and the uneven placement makes it feel intentional rather than neat. It works especially well in low light, where the eyes catch attention without needing extra decoration.
Key Highlights:
- No carving involved
- Uses a single paint color
- Focuses on contrast and placement
- Works well with small pumpkins
Who it’s best for:
- People who like subtle but creepy decor
- Anyone avoiding carving tools
- Decorators working with limited time
5. Confetti Pumpkins
Begin by painting pumpkins in solid colors, usually light shades that help the confetti stand out. Once dry, glue is applied in sections, and confetti is pressed onto the surface. Some keep the confetti clustered in one area, while others spread it evenly for a scattered look.
This idea leans more decorative than spooky. It feels closer to party decor than traditional Halloween style, which makes it flexible. Depending on the colors and confetti used, the same setup can work indoors on a table or outside on a porch.
Key Highlights:
- Combines paint with simple craft materials
- Easy to customize with different colors
- More decorative than scary
- Works for indoor and outdoor displays
Who it’s best for:
- People decorating shared or neutral spaces
- Households that prefer lighter Halloween themes
- Anyone looking for a clean, playful look
6. Turtle Pumpkins
Use mini pumpkins as the base, painting them to resemble turtle shells. Modeling clay is shaped into heads, legs, and tails, then attached to the pumpkin once the paint dries. Simple details like eyes or shell patterns help bring the turtles to life without much effort.
This idea shifts away from Halloween entirely and leans into cute fall decor. The pumpkins stop feeling seasonal and start looking like small characters. It takes a bit more hands-on work than painting alone, but the steps stay straightforward.
Key Highlights:
- Turns pumpkins into character-style decor
- Uses paint and modeling clay together
- Works best with mini pumpkins
- Focuses on shape rather than detail
Who it’s best for:
- Families crafting together
- People who enjoy cute, non-spooky decor
- Anyone looking for a longer-lasting fall display
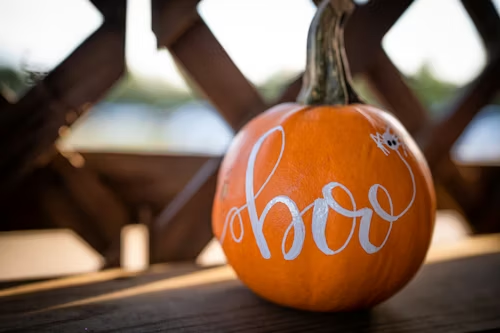
7. Bright Pumpkin Decor
Start by choosing a simple color palette and a short phrase, then paint directly onto the pumpkin without overthinking the layout. Classic words like Boo work well because they are easy to place and still feel seasonal. The focus stays on clear lettering and solid colors rather than detail or shading.
This idea is straightforward and flexible. The pumpkin can be bold and playful or calm and clean depending on the colors used. It does not rely on special tools or careful steps, which makes it easy to adjust as they go if something feels off.
Key Highlights:
- Simple painted words or short phrases
- Works with bright or neutral colors
- No special tools needed
- Easy to repaint if needed
Who it’s best for:
- People who like clean, readable designs
- Quick decorating projects
- Anyone new to painting pumpkins
8. Stencil Pumpkins
Use stencils to guide the design, placing them flat against the pumpkin before painting over the cutouts. Stencils can be made at home, found online, or bought ready to use. This helps keep lines clean, even on curved surfaces that are hard to paint freehand.
This approach removes most of the guesswork. The design stays controlled, which can be helpful when multiple pumpkins need to look similar. It also keeps the process calm and predictable, especially when working with kids.
Key Highlights:
- Helps create clean shapes and letters
- Reduces freehand painting mistakes
- Works with homemade or store-bought stencils
- Keeps designs consistent
Who it’s best for:
- Families painting together
- People who prefer guided designs
- Group projects or classrooms
9. Drippy Copper Gourds and Pumpkins
Begin by using copper liquid leaf to paint a loose line around the top of a dried gourd or pumpkin. The paint is left uneven on purpose so it drips at different speeds and lengths. After the drip line dries, the area above it is filled in with copper paint to finish the look.
This idea is more about movement than precision. The drips add texture and variation without needing fine detail. Because the paint is runny, using a light hand helps keep the result natural rather than heavy.
Key Highlights:
- Uses metallic paint for contrast
- Drip effect creates uneven texture
- Works well on dried pumpkins or gourds
- No detailed brush work needed
Who it’s best for:
- People who like simple but bold decor
- Fall displays beyond Halloween
- Decorators looking for a low-detail project
10. Spider Web Pumpkins
Ccreate the web pattern by laying long strips of tape across the pumpkin before painting. The tape acts as a guide, so the web shape stays clear even on a curved surface. Spray paint is applied in light layers, letting each coat dry before adding more. Once the paint sets, the tape is peeled away to reveal the web design underneath.
The look stays simple but effective. Adding a plastic spider at the end gives the pumpkin a clear focal point without making it feel busy. It works well as part of a group display, especially when several pumpkins are painted in similar colors.
Key Highlights:
- Uses tape to form clean web shapes
- Spray paint keeps coverage even
- No carving required
- Easy to repeat across multiple pumpkins
Who it’s best for:
- People who like bold, graphic designs
- Porch or outdoor displays
- Anyone wanting a spooky look without detail work
11. Hocus Pocus Pumpkins
Paint each pumpkin to match a character, then add small details using basic craft supplies. Pom poms, pipe cleaners, and paper are used to suggest hair, facial features, and accessories. The pumpkins do not aim for realism, which keeps the process light and forgiving.
This idea leans into humor and familiarity. The pumpkins feel more like playful characters than decorations, which makes them stand out in a mixed display. Small imperfections usually add to the charm rather than take away from it.
Key Highlights:
- Uses simple craft supplies
- Focuses on character rather than detail
- Easy to personalize each pumpkin
- No strict painting rules
Who it’s best for:
- Fans of themed decor
- Family crafting sessions
- Displays meant to feel fun, not scary
12. Popcorn Pumpkin
Start by painting the pumpkin to resemble a popcorn bucket, using construction paper strips as guides for straight lines. Once the base is painted and dry, a scalloped edge is added near the top to finish the bucket shape. Real popcorn is then glued on to complete the look.
The mix of paint and real texture is what makes this idea work. The popcorn adds height and contrast without much effort. It feels more decorative than spooky and fits easily into fall setups that are not strictly Halloween themed.
Key Highlights:
- Combines paint with real texture
- Clear shape makes the design readable
- Uses basic craft materials
- Minimal detail work
Who it’s best for:
- Indoor displays or centerpieces
- People who prefer lighthearted decor
- Projects that mix craft and painting
13. Black and White Striped Pumpkin
Start by painting the entire pumpkin white and letting it dry fully before adding any detail. Once the base is set, they use the natural grooves in the pumpkin as a guide for painting vertical black stripes. The stripes can be thick, thin, or uneven depending on how controlled they want the final look to be. Painting the stem black at the end helps tie the whole design together.
This idea keeps things simple and balanced. The contrast does most of the work, so there is no need for extra decoration. It fits easily into both Halloween and general fall displays without leaning too hard into either one.
Key Highlights:
- Uses only two paint colors
- Natural pumpkin grooves guide the stripes
- Clean, graphic look
- No extra materials needed
Who it’s best for:
- People who like minimal designs
- Indoor decor or shelves
- Anyone avoiding themed characters
14. Spa Pumpkin
Choose a round pumpkin and paint a face mask shape using green or teal paint, leaving space for basic facial features. Once the paint dries, a shower cap is stretched over the top and pinned in place to look like wrapped hair. Paper or printed cucumber slices are added for the eyes to complete the spa look.
This design works because it is unexpected but easy to read at a glance. It does not rely on detailed painting or realism. The humor comes from the familiar spa setup rather than from the pumpkin itself, which keeps the process simple.
Key Highlights:
- Uses everyday items like a shower cap
- Minimal painting required
- Focuses on visual humor
- Easy to assemble and adjust
Who it’s best for:
- People who like playful decor
- Indoor displays
- Quick projects with simple steps
15. Mini Spider Pumpkin
Remove the stem and paint the pumpkin with glossy black paint, letting it dry completely before adding anything else. Craft or floral wire is cut into equal pieces and pushed into the sides to form eight legs. Each wire is bent to give the spider shape, and googly eyes are glued on top to finish the look.
This idea turns a small pumpkin into a clear shape rather than a surface design. The shine of the black paint helps the spider stand out, especially when grouped with others. It looks creepy without needing extra detail or carving.
Key Highlights:
- Turns a pumpkin into a simple spider shape
- Uses wire for structure
- Glossy paint adds contrast
- Works well in groups
Who it’s best for:
- People decorating small spaces
- Displays that need visual variety
- Anyone wanting a spooky look without carving
16. Pastel Face Pumpkins
Sstart by painting the pumpkin in a soft pastel shade using matte spray paint. Once the base color is dry, simple facial details are added with acrylic paint. The faces are not meant to look realistic. Slightly uneven lines and small quirks are part of what makes them work.
This idea feels calm rather than spooky. The pastel colors soften the pumpkin shape and make it fit into everyday fall decor. It also leaves room to experiment, since changing a face detail is easier than repainting the whole pumpkin.
Key Highlights:
- Uses soft pastel base colors
- Simple facial details added by hand
- No carving involved
- Easy to repaint or adjust
Who it’s best for:
- People who prefer light, non-spooky decor
- Indoor fall displays
- Anyone comfortable with basic brush work
17. Trailer Pumpkin
Paint the pumpkin to resemble a small vintage trailer, using two shades of the same color to suggest depth. Gray paint is used for doors and windows, while black outlines help define the shape. The design relies on clean lines rather than detailed shading.
This idea takes a bit more planning than simple patterns, but the steps stay manageable. It turns the pumpkin into a scene instead of a surface design, which makes it stand out without needing extra materials.
Key Highlights:
- Uses layered colors for structure
- Focuses on shape and outlines
- No added craft materials needed
- Works best on smooth pumpkins
Who it’s best for:
- People who enjoy themed designs
- Fall decor that is not strictly Halloween
- Painters who like working with lines
18. Black Bat Pumpkin
Begin by painting the pumpkin in a bright neon color and letting it dry completely. Once dry, black paper bats are attached to the surface. The contrast between the bright base and dark shapes keeps the design clear and easy to read.
This idea depends more on placement than paint skill. The bats can be arranged loosely or clustered together depending on the look they want. Because paper is involved, it works best in covered or indoor spaces.
Key Highlights:
- Combines paint with paper shapes
- High contrast design
- Minimal painting detail required
- Quick to assemble
Who it’s best for:
- People decorating small indoor areas
- Projects with limited time
- Anyone wanting a bold but simple look
19. Punny Painted Pumpkin
Begin by painting the pumpkin in a light base color, most often white, so the text stays easy to read. A short phrase is outlined lightly in pen first, then traced over with black paint to keep the letters steady. The wording does not need to be perfect. Small flaws usually make it feel more natural and less staged.
What finishes the look is the added detail at the stem, like a simple tassel ghost. It turns the pumpkin into more than just text on a surface. The result feels casual and playful without needing much planning or paint skill.
Key Highlights:
- Light base color keeps text clear
- Hand painted lettering with minimal detail
- Small add on element for character
- Easy to repaint if needed
Who it’s best for:
- People who like word based decor
- Simple indoor displays
- Anyone comfortable with basic lettering
20. 3D Painted Pumpkins
Sketch a design lightly on the pumpkin using a pencil before adding any paint. Puff paint is then traced over the lines, creating raised details that sit above the surface. Once the puff paint dries fully, the stem is taped off and the pumpkin is spray painted to keep the texture clean and visible.
This approach adds depth without carving or cutting. The raised lines stand out more once the pumpkin is painted over, especially with matte finishes. It works just as well for simple shapes as it does for more detailed patterns.
Key Highlights:
- Raised texture without carving
- Puff paint defines the design
- Spray paint keeps the surface even
- Works with simple or detailed sketches
Who it’s best for:
- People who like texture over flat designs
- Slower craft projects
- Anyone wanting a cleaner finish
21. Rainbow Mini Pumpkins
Use small white pumpkins and paint each section following the natural grooves. A lighter shade goes on first, which makes it easier to adjust with a darker tone later. Each pumpkin usually sticks to one color family rather than mixing shades across the surface.
This idea is more about balance than precision. The grooves help keep the colors neat, and working small makes mistakes less noticeable. Grouped together, the pumpkins feel coordinated without needing identical designs.
Key Highlights:
- Uses natural grooves as guides
- Two shades of one color per pumpkin
- Small size keeps the process manageable
- Easy to correct paint mistakes
Who it’s best for:
- People who enjoy color focused projects
- Tabletop or shelf displays
- Anyone experimenting with paint for the first time

22. Googly Eye Pumpkin
Paint the entire pumpkin black, usually applying two coats so the surface looks even. Once the paint dries, googly eyes are glued on wherever they fit. There is no pattern to follow, and that is part of the appeal. The eyes can be spaced out or crowded together depending on the look they want.
This idea relies more on humor than skill. The simple setup makes it easy to finish quickly, and the result always feels a bit strange in a good way. It works best when the pumpkin is left otherwise plain, so the eyes stay the main focus.
Key Highlights:
- Uses basic paint and craft glue
- No design planning required
- Quick setup from start to finish
- Easy to change or add more eyes
Who it’s best for:
- People who like silly decor
- Last minute decorating projects
- Anyone avoiding detailed painting
23. Feather Pumpkin
Start by painting the pumpkin black and letting it dry completely. Faux feathers are then attached using Mod Podge, working section by section so they stay in place. A light layer of adhesive on top helps smooth the feathers and keep them from lifting.
This design adds texture rather than color. The feathers soften the pumpkin shape and give it a different feel compared to painted surfaces. It looks more styled than spooky, especially when displayed indoors.
Key Highlights:
- Focuses on texture over paint detail
- Uses faux feathers and adhesive
- No fine brush work needed
- Works best indoors
Who it’s best for:
- People who enjoy mixed materials
- Decor that leans more decorative than scary
- Projects that can dry overnight
24. Tiny Bow Pumpkins
Paint the pumpkin first, keeping the base color simple so the bows stand out. Small ribbon bows are tied or bought ready made, then attached with small dots of hot glue. The bows are spaced evenly or placed at random depending on the look they prefer.
This idea is subtle and controlled. The bows add detail without covering the whole pumpkin, which keeps it clean and balanced. It works well when the goal is to add something different without changing the pumpkin too much.
Key Highlights:
- Uses ribbon or pre made bows
- Minimal materials required
- Easy to control the final look
- No painting detail involved
Who it’s best for:
- People who like simple accents
- Indoor fall displays
- Anyone wanting a neat finish
25. Paint Pen Patterned Pumpkins
Use mini white pumpkins as a blank surface and draw directly on them with paint pens. Patterns can be simple lines, dots, or repeated shapes, and the colors do not have to stay neutral. Working small makes it easier to test ideas without committing to a full design.
This approach feels relaxed and flexible. Mistakes blend into the pattern instead of standing out, which keeps the process low stress. It also works just as well on artificial pumpkins, especially when the goal is something that lasts beyond the season.
Key Highlights:
- Uses paint pens instead of brushes
- Small pumpkins keep designs manageable
- Easy to mix colors and patterns
- Works on real or artificial pumpkins
Who it’s best for:
- People who enjoy drawing more than painting
- Tabletop or shelf displays
- Anyone experimenting with patterns
26. Glitter Stem Pumpkin
Paint the pumpkin first and let it dry completely before touching the stem. Glue is brushed onto the stem, then dipped into craft glitter until it is fully coated. After drying, the stem becomes the main detail while the rest of the pumpkin stays simple.
This idea keeps the focus tight. Instead of covering the whole pumpkin, it highlights one part. The sparkle adds contrast without turning the pumpkin into a full glitter project, which keeps it easy to live with indoors.
Key Highlights:
- Focuses detail on the stem only
- Uses glue and craft glitter
- Quick add on to a painted pumpkin
- Minimal cleanup
Who it’s best for:
- People who like small details
- Simple fall decor with one accent
- Quick finishing touches
27. Black Cat Pumpkin
Start by placing painter’s tape on an orange pumpkin to create the shape of a cat face. Black acrylic paint is applied over the taped areas, covering the design in one or two coats. Once the paint dries, the tape is peeled away to reveal the cat features underneath.
This idea is forgiving by design. Clean lines are nice, but uneven edges do not ruin the look. The cat shape stays clear even if the paint goes outside the tape, which makes the process less fussy.
Key Highlights:
- Uses tape to guide the design
- No detailed brush work needed
- Clear shape with minimal steps
- Easy to redo if needed
Who it’s best for:
- People who like simple character designs
- Porch or entryway displays
- Anyone avoiding freehand painting
Wrapping Up
Painted pumpkins take a lot of the pressure out of fall decorating. There is no rush to carve, no cleanup to worry about, and no single way things are supposed to look. Some ideas lean funny, some stay simple, and others add texture or small details that quietly change the whole feel of a pumpkin.
That flexibility is really the point. You can keep things quick and playful or slow down and experiment a bit more. Most of these ideas work just as well on a random afternoon as they do for a full Halloween setup. In the end, a painted pumpkin does not need to be perfect. If it feels like you had a good time making it and it fits your space, it did its job.